ZEC Adding RTSP Streams
This enables you to create RTSP streams.
To Add RTSP Streams:
In the ZEC Navigation menu, click the Inputs tab.
In the Menu bar, click +New Input.
The Add a new input stream window is displayed.
Select the maximum concurrent connections to this stream from the Max. Outputs drop-down list. Default: Unlimited.
Enter the unique Stream ID.
Note this must be identical (case sensitive) to the stream name configured in the sending Zixi Broadcaster or MediaConnect.
Select the Show in Matrix check box to display this stream in the Matrix (see ZEC Using the Matrix). Default: Selected.
Select the Log this stream checkbox if you would like to generate event logs for this input.
Select the Analyze checkbox if you would like to enable stream analysis for the input.
Select RTSP for the input stream.
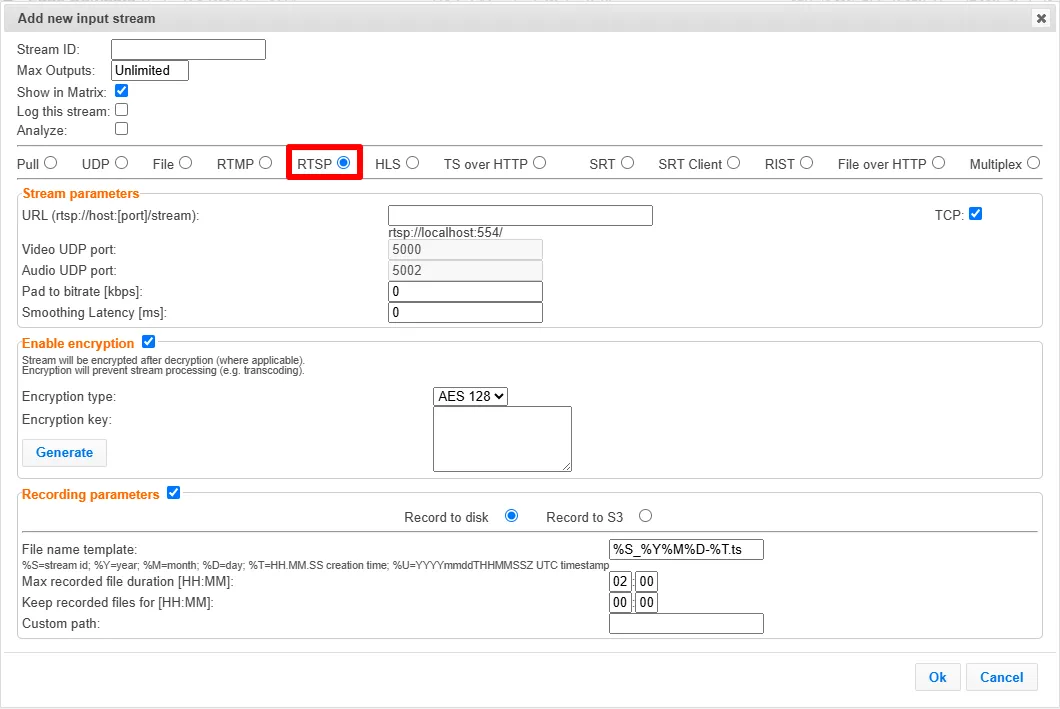
Specify the Stream Parameters (see the Input Stream Parameters TableInput Stream Parameter Table below).
If you want to Enable encryption, select this checkbox (see Input Stream Parameters Table). For more information, see ZEC Encrypting an Input Stream.
If you want to configure the Recording Parameters, specify them in the respective fields (see Input Stream Parameters Table).
Click OK.
The “Input added” message appears on the top of the screen. The RTSP stream is added to ZEC and now appears in the list of streams available in the ZEC inputs UI.
Input Stream Parameters Table
Parameter | Description |
|---|---|
Stream Parameters | |
URL | Type the Stream URL from which the ZEC will access. |
TCP | Select this checkbox for streams that use the TCP protocol. Leave unselected for UDP. |
Video UDP Port | Specify the UDP port to be used for streaming the video. |
Audio UDP Port | Specify the UDP port to be used for streaming the audio. |
Pad to bitrate [kbps] | If the stream's bitrate fluctuates, you can pad the stream with null packets to create a steady bitrate. This setting determines the padding level in kbps. |
Smoothing Latency [ms] | Specify the maximum latency you can tolerate for the stream in milliseconds. Recommended - the length of two frames. |
Enable encryption | Select this checkbox to encrypt the Input stream. The stream encryption prevents any further processing, such as analysis, transcoding, etc. The encryption works in the following way:
For more information, see ZEC Encrypting an Input Stream. |
Encryption type (for Encryption enabled) | Specify the type of Encryption (AES 128/192/256). |
Encryption key (for Encryption enabled) | Click Generate to generate an encryption key. The generated encryption key must be sent to the end-user to decipher the received encoded stream. |
Recording parameters | Select this checkbox to customize the recording parameters. |
Destination Type | Select the radio button for the desired storage type and then fill in the relevant parameters.
|
Record to Disk Parameters | |
File Name Template | Specify the file name pattern that Zixi will use to generate when saving the recorded content. A separate file will be generated for each recording up to the time specified in the Max recorded file duration parameter (see above). After this duration, a new file will be generated. The file name pattern can include any string and up to five variables listed below. Only the %T=HH.MM.SS creation time is mandatory. You can change the order of these variables and add text as long as you maintain the legitimate structure of the file in Linux and Windows:
For example, the following pattern %Y_recording%T.ts will generate the following file name 2022_recording15:32:35.ts. |
Max recorded file duration [HH:MM] | Specify the maximum time allotted for recording a video stream. Default: 2 hours |
Keep recorded files for [HH:MM] | Specify the maximum time for storing the recording. Default: 0 hours |
Custom Path | Optionally specify a storage location for the recorded files that is relative to the root folder. This location bypasses the location specified as the root folder in the Settings > General screen. |
Record to S3 Parameters | |
File Name Template | Specify the file name pattern that Zixi will use to generate when saving the recorded content. A separate file will be generated for each recording up to the time specified in the Max recorded file duration parameter (see above). After this duration, a new file will be generated. The file name pattern can include any string and up to five variables listed below. Only the %T=HH.MM.SS creation time is mandatory. You can change the order of these variables and add text as long as you maintain the legitimate structure of the file in Linux and Windows:
For example, the following pattern %Y_recording%T.ts will generate the following file name 2022_recording15:32:35.ts. |
Max recorded file duration [HH:MM] | Specify the maximum time allotted for recording a video stream. Default: 2 hours |
URL | Specify the URL of the S3 bucket. |
Ignore TLS certificate errors | TLS certificate for S3 bucket might be detected as faulty if bucket name contains dot[s]. When this option is selected, ZEC will ignore the TLS certificate errors and transmit the stream to its destination. |
Access Key | The access key that is used for accessing the S3 bucket. |
Secret Key | The secret key that is used for accessing the S3 bucket. |
Advanced Mode
The fields discussed below are optional and available only in Advanced Mode.
To enter Advanced Mode add the URL parameter ?advanced=1 to the ZEC URL in your browser and press Enter/Return to reload the page:

Note the Advanced Mode settings are generally intended for advanced users and special cases. If you do not understand the settings, you should probably accept the default values.
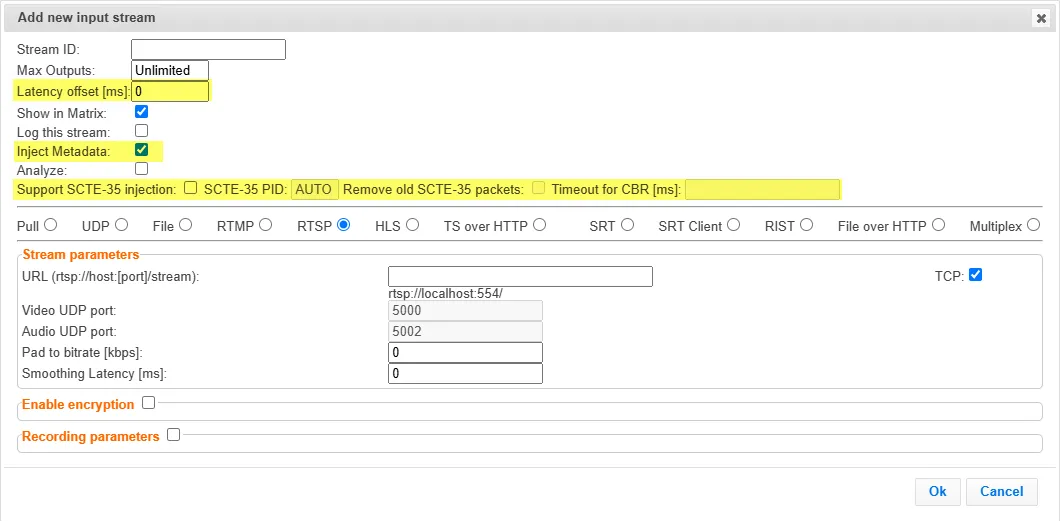
General
- Latency Offset [ms] - Specify the additional buffering time in milliseconds. Increasing this value can improve stream stability in unstable network conditions, but will increase end-to-end delay. Default: 0 ms
- Inject Metadata - allows Zixi create a PID that carries information about what hops a feed has travelled through on the way to its destination, it includes things like CC errors and IAT at each hop. The information is useful for debugging issues with streams.
- Support SCTE-35 injection - Select this checkbox if you would like the stream to support SCTE-35 insertion.
- SCTE-35 PID - Enter a PID number for SCTE-35 injection. You can enter a value manually or use the Up/Down arrows that appear when clicking the field. (or leave as Auto to match existing SCTE-35 PID)
- Remove old SCTE-35 packets - If SCTE-35 injection is supported, select this checkbox to clear out existing packets.
- Timeout for CBR - Time in MS to wait for a NULL packet to inject SCTE-35 into.