Adding Multiplex Streams
The Multiplex input enables you to combine multiple SPTS streams into a single Multiplex stream. The MPTS should have a Target bitrate that is higher than the sum of all of the effective bitrates of the individual STPS inputs included in the multiplex stream. The process involves selecting multiple streams from the list of existing streams. Each input stream will become a Program in the MPTS stream. You will need to name the program and can optionally specify a Program number (by default, the first program number is 0). This program number will be assigned to the program in the newly created MPTS, regardless of the original program number. To avoid PID ID conflicts between the PIDs in the source SPTS and the output MPTS, it is recommended to set a Base PID ID number that is high enough. The base PID will be the first number that is used to assign to the various PIDs in the stream. When adding additional streams, make sure that the Base PID number value of the additional stream is higher than 10 than the previous one (e.g., 1000, 1011, etc.).
To Add a Multiplex Stream:
In the Zixi Broadcaster Navigation menu, click the Inputs tab.
In the Menu bar, click New Input. The Add a new input stream window is displayed.
Enter the unique Stream ID. Note: this must be identical (case sensitive) to the stream name configured in the ZEC
Select the maximum concurrent connections to this stream from the Max. Outputs drop-down list. Default: Unlimited.
Select the Show in Matrix check box to display this stream in the Matrix (see Using the Matrix). Default: Selected.
Select the Log this stream checkbox if you would like to generate event logs for this input.
Select the Analyze checkbox if you would like to enable stream analysis for the input.
Select Multiplex for the input stream.
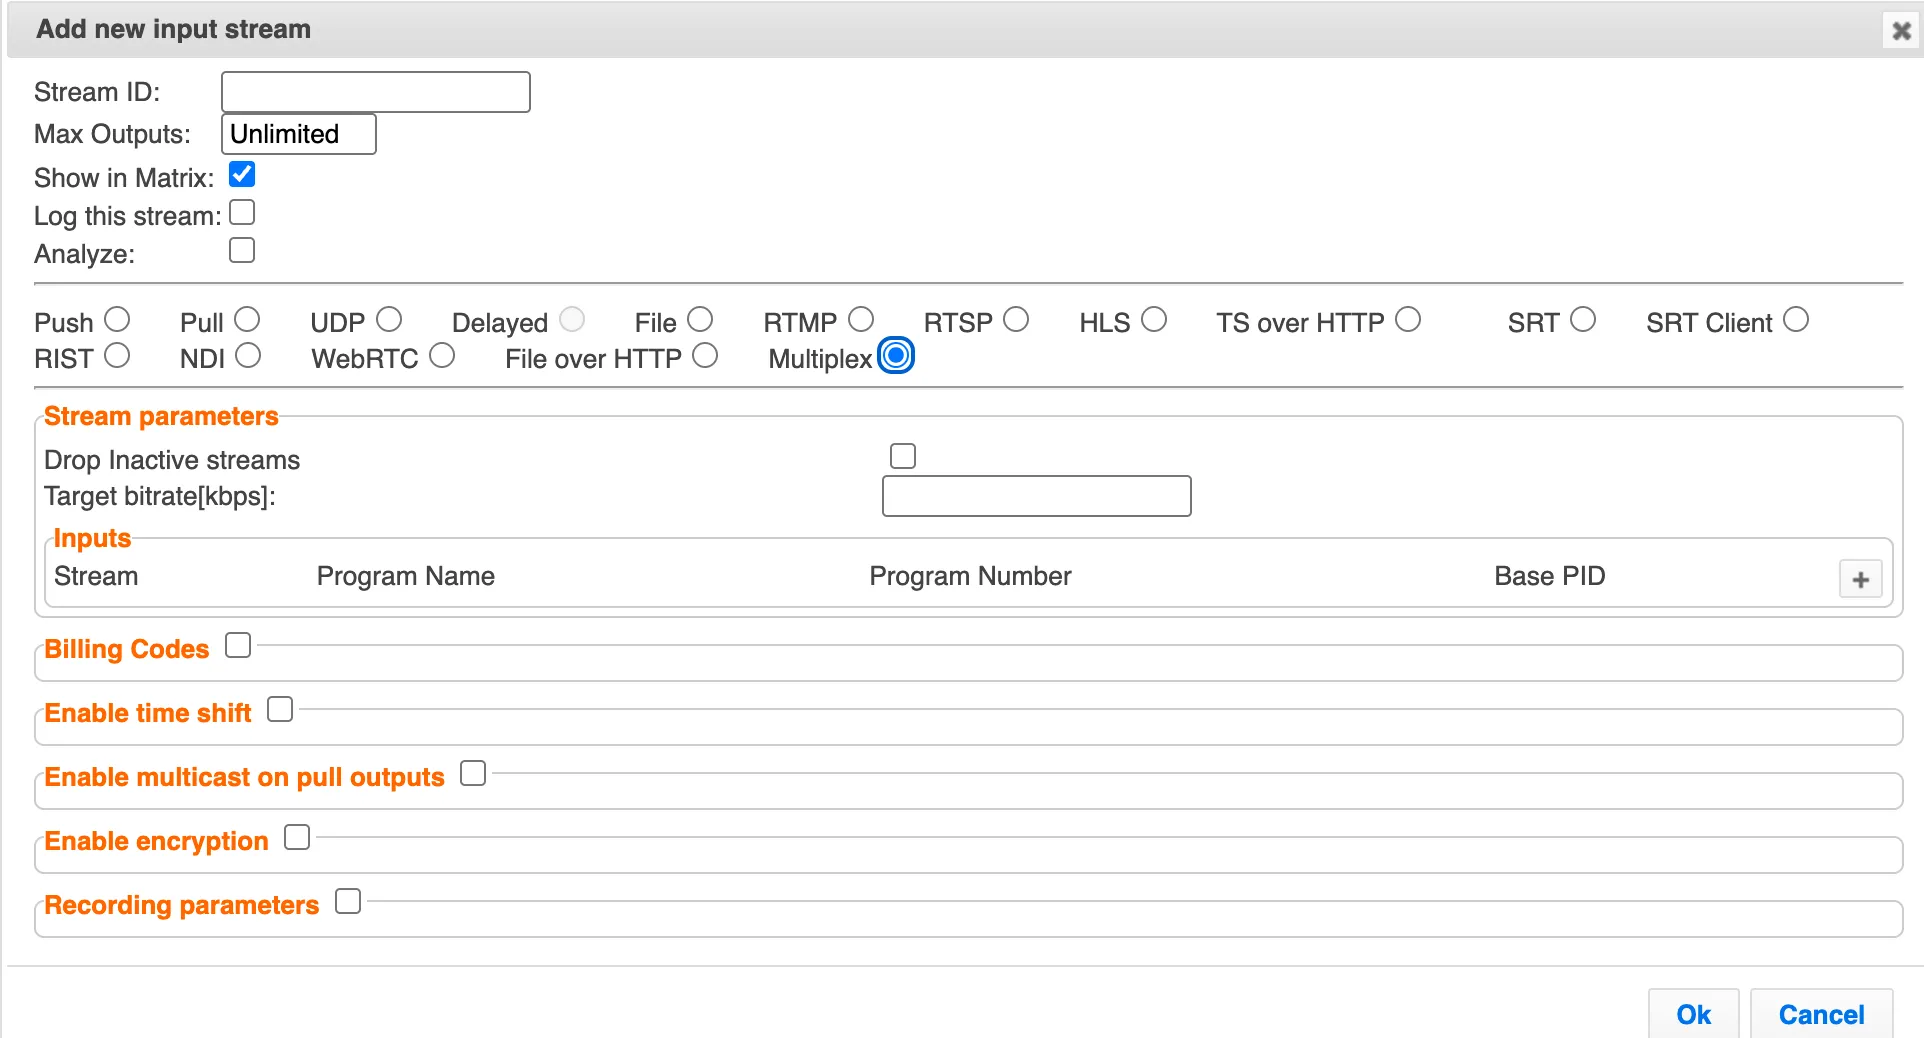
Select the Drop Inactive Streams checkbox if you do not want to include in the MPTS streams that are inactive.
In the Target bitrate (kbps) field, specify the target bitrate for the multiplex stream in kbps. The target bitrate number should be at least as high as the sum of all of the effective bitrates of the individual STPS inputs included in the multiplex stream.
Under Inputs, click the + button and specify the following settings:
- Click the Stream field to select the STPS stream.
- The selected stream will become a program in the MPTS stream. In the Program Name, enter a name for this program. This overwrites any pre-existing Program Name previously assigned to the stream.
- In the Program Number field, enter a Program Number for the SPTS stream. This overwrites any pre-existing Program Number previously assigned to the stream.
- In the Base PID, enter a Base PID number for the STPS stream. Zixi will automatically assign new PID numbers for all PIDs in the SPTS stream with consecutive numbers following the Base PID number based on this number. (Note that the lowest number allowed is 33.)
Click the + again to add another STPS stream and enter the relevant details. Each Input’s Base PID should be separated by an interval greater than 10 (e.g., 1000, 1011, etc.).
Specify additional Stream Parameters (see Input Stream Parameters Table).
If you want to specify Billing Codes to identify and differentiate traffic on a Zixi Broadcaster for billing purposes, select this checkbox (see Input Stream Parameters TableInput Stream Parameter table).
If you want to Enable time shift, select this checkbox (see Input Stream Parameters Table). The stream will be recorded and broadcast after the specified delay. The time shift feature is typically used to broadcast a live event across time zones (due to the time differences between locations).
If you want to Enable multicast on pull outputs, select this checkbox (see Input Stream Parameters Table).
You can encrypt the stream as it enters Zixi Broadcaster. To encrypt the stream, select the Enable encryption checkbox and fill in the parameters as described in the Input Stream Parameters Table below. For more information, see Encrypting an Input Stream in Zixi Broadcaster.
If you want to configure the Recording Parameters, specify them in the respective fields (see Input Stream Parameters Table).
Click OK.
The “Input added” message appears at the top of the screen. The Multiplex Stream is added to the Zixi Broadcaster and now appears in the list of streams available in the Zixi Broadcaster inputs UI. The created MPTS file is accessible in the File tab at the top of the Zixi Broadcaster administrative screen and can be added as a new File input stream in the Add a new input stream window.
Input Stream Parameters Table
Parameter | Description |
|---|---|
Stream Parameters | The general stream settings. |
Drop Inactive Streams | Select this checkbox if you do not want to include MPTS streams that are inactive. |
Target bitrate [kbps] | Specify the target bitrate for the multiplex stream. The target bitrate number should be at least as high as the sum of all of the effective bitrates of the individual STPS inputs included in the multiplex stream. |
Inputs | Click “+” to add a stream. |
Stream | Select a stream ID from the drop-down list. |
Program Name | Enter a Program Name for the SPTS stream. This overwrites any pre-existing Program Name previously assigned to the stream. |
Program Number | Enter a Program Number for the SPTS stream. This overwrites any pre-existing Program Number previously assigned to the stream. |
Base PID | Enter a Base PID number for the STPS stream. Zixi will automatically assign new PID numbers for all PIDs in the SPTS stream with consecutive numbers following the Base PID number based on this number. Each Input’s Base PID should be separated by an interval greater than 10. Note:
|
Billing Codes | Billing codes are used to identify and differentiate traffic on a Zixi Broadcaster for billing purposes. When a billing code is added to a Source or Target, Zixi can track the traffic on that Broadcaster input or output separately from other inputs and outputs on the same Broadcaster. Billing codes are created by Zixi personnel on the Zixi Customer Portal for a particular organization. |
Billing Code | Enter the billing code that corresponds to this stream. The relevant billing can be obtained from the organization that received the billing code from Zixi. |
Billing password | Enter the password that corresponds to this billing code. |
Enable time shift | Select this checkbox to record the stream content and broadcast it after a specified delay. To deploy an input stream that uses the current stream's time shift, you need to configure a "Delayed" input stream, see Adding Delayed Streams. |
Maximum delay [hh:mm:ss] | Specify the time of the delayed transmission of this stream. Maximum: 24 hours. |
Enable multicast on pull outputs | Select this checkbox to enable the transmission of this stream’s outputs as multicast. A Zixi receiver that will pull the stream will receive it in multicast. By default, Zixi Broadcaster is configured to allow transparent fallback to unicast if it is out of the LAN. Requires enabling Multicast Pull in the Settings. |
Multicast Only | Selecting this checkbox will force the transmission of this stream only in multicast. |
Enable Encryption | Select this checkbox to encrypt the Input stream. The stream encryption prevents any further processing, such as analysis, transcoding, etc. The encryption works in the following way:
For more information, see Encrypting an Input Stream in Zixi Broadcaster. |
Encryption type (for Encryption enabled) | Specify the type of Encryption (AES 128/192/256). |
Encryption key (for Encryption enabled) | Click Generate to generate an encryption key. The generated encryption key must be sent to the end-user to decipher the received encoded stream. |
Recording parameters | Select this checkbox to customize the recording parameters. |
Destination Type | Select the radio button for the desired storage type and then fill in the relevant parameters.
|
Record to Disk Parameters | |
File Name Template | Specify the file name pattern that Zixi will use to generate when saving the recorded content. A separate file will be generated for each recording up to the time specified in the Max recorded file duration parameter (see above). After this duration, a new file will be generated. The file name pattern can include any string and up to five variables listed below. Only the %T=HH.MM.SS creation time is mandatory. You can change the order of these variables and add text as long as you maintain the legitimate structure of the file in Linux and Windows:
For example, the following pattern %Y_recording%T.ts will generate the following file name 2017_recording15:32:35.ts. |
Max recorded file duration [hours] | Specify the maximum time allotted for recording a video stream. Default: 2 hours |
Keep recorded files for [hours] | Specify the maximum time for storing the recording. Default: 0 hours |
Custom Path | Optionally specify a storage location for the recorded files that is relative to the root folder. This location bypasses the location specified as the root folder in the Settings > General screen. |
Record to S3 Parameters | |
File Name Template | Specify the file name pattern that Zixi will use to generate when saving the recorded content. A separate file will be generated for each recording up to the time specified in the Max recorded file duration parameter (see above). After this duration, a new file will be generated. The file name pattern can include any string and up to five variables listed below. Only the %T=HH.MM.SS creation time is mandatory. You can change the order of these variables and add text as long as you maintain the legitimate structure of the file in Linux and Windows:
For example, the following pattern %Y_recording%T.ts will generate the following file name 2017_recording15:32:35.ts. |
Max recorded file duration [hours] | Specify the maximum time allotted for recording a video stream. Default: 2 hours |
URL | Specify the URL of the S3 bucket. |
Ignore TLS certificate errors | TLS certificate for S3 bucket might be detected as faulty if bucket name contains dot[s]. When this option is selected, Zixi Broadcaster will ignore the TLS certificate errors and transmit the stream to its destination. |
Access Key | The access key that is used for accessing the S3 bucket. |
Secret Key | The secret key that is used for accessing the S3 bucket. |
Advanced Mode
The fields discussed below are optional and available only in Advanced Mode.
To enter Advanced Mode add the URL parameter ?advanced=1 to the Zixi Broadcaster URL in your browser and press Enter/Return to reload the page:

Note the Advanced Mode settings are generally intended for advanced users and special cases. If you do not understand the settings, you should probably accept the default values.
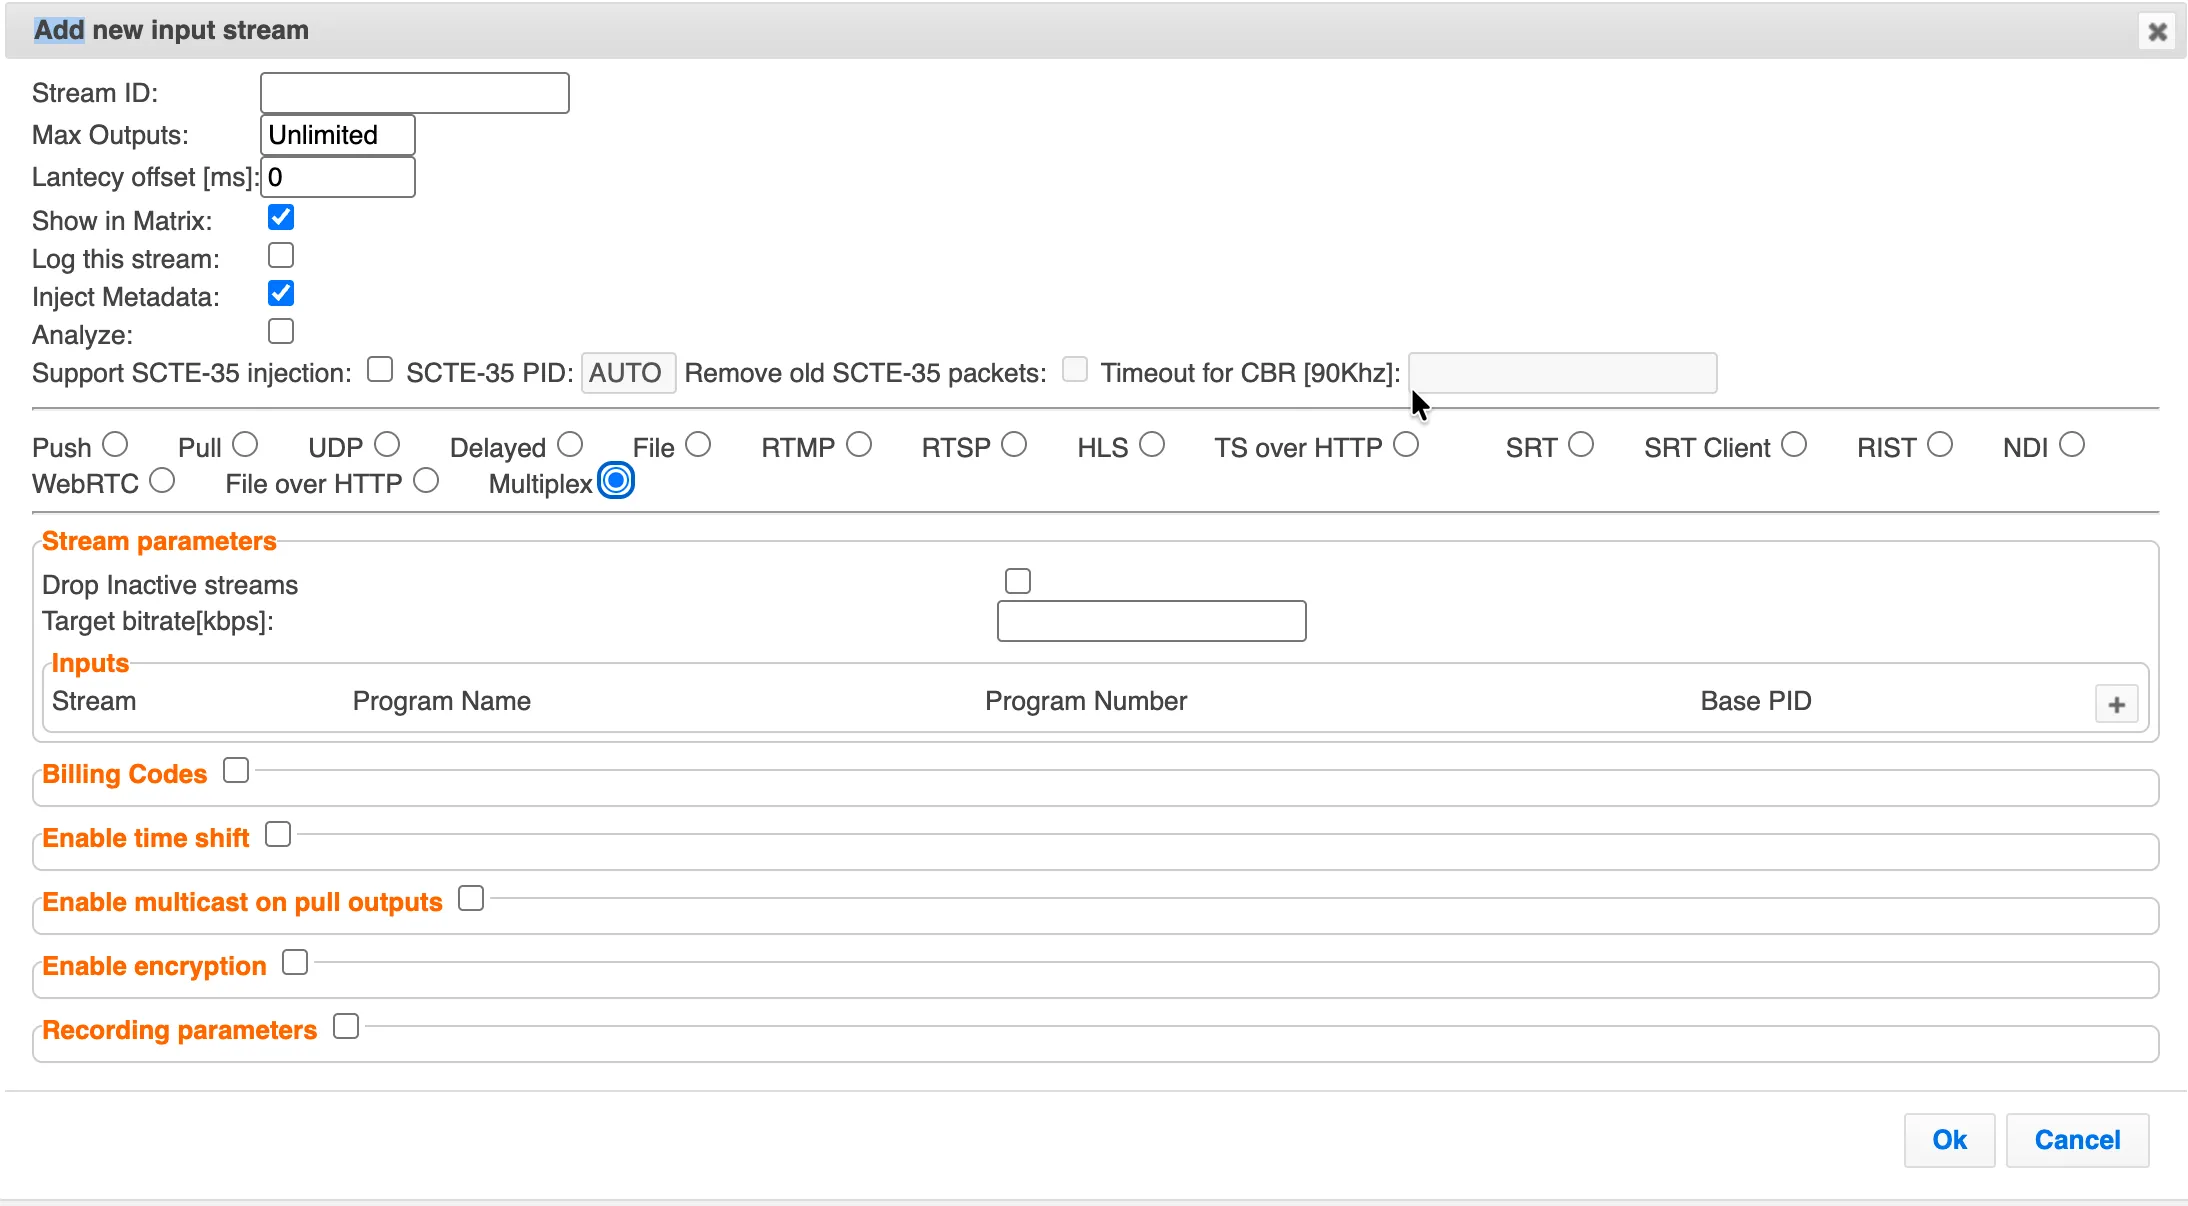
- Inject Metadata - allows Zixi create a PID that carries information about what hops a feed has travelled through on the way to its destination, it includes things like CC errors and IAT at each hop. The information is useful for debugging issues with streams.
SCTE-35
The most commonly used advanced settings are those which relate to SCTE markers:
- Support SCTE-35 injection - select this if you want to be able to insert your own SCTE-35 messages for such purposes as inserting a preroll or ad break
- SCTE-35 PID - You can specify a specific PID for SCTE-35 injection, or leave it at the default AUTO value
- Remove old SCTE-35 packets - If you are inserting new SCTE-35 messages, it's a good idea to remove any old ones, unless you know what they are and that they need to stay
- Timeout for CBR - Number of MS to wait for a null packet to insert SCTE-35 (keeps the stream CBR).
Latency Offset
Latency offset is a configuration parameter that delays the processing of a transport stream by a defined amount of time (in milliseconds). This delay is not arbitrary—it serves specific operational goals:
- SCTE-35 Cue Injection and Pre-roll Support In broadcast workflows, SCTE-35 markers signal ad breaks or content insertion points. By applying a latency offset, the system can inject SCTE-35 packets ahead of playback, ensuring accurate timing for ad insertion or blackout triggers. This is critical for compliance and monetization workflows. Example: Zixi Broadcaster introduced latency offset to enable SCTE-35 insertion after the offset for pre-roll scenarios.
- Stream Normalization and Timeline Alignment HLS inputs often arrive with irregular timestamps (PCR, PTS, DTS) or discontinuities. Adding a latency offset gives the system time to buffer and normalize segments, repair timeline irregularities, and remultiplex into a stable MPEG-TS output. This prevents audio drift and switching errors downstream.
- Smooth Buffering for Burst Handling When upstream encoders send data in bursts, latency offset combined with buffering helps maintain a steady flow into the broadcaster. This avoids jitter and packet timing issues that could disrupt adaptive bitrate workflows.