Adding Zixi AWS MediaConnect Targets
You can configure an AWS MediaConnect "flow" that you have already set up in your MediaConnect account to be used as a Target in ZEN Master.
In order to use this feature, you must first link ZEN Master to an AWS account, see Linking an AWS Account,
The following procedure describes how to add an AWS MediaConnect Target in ZEN Master. In addition, an explanation of each of the configuration parameters is given in the table below.
To add a new MediaConnect Target:
In the main navigation, click Targets.
Click + Add. The Create New Target window is displayed.
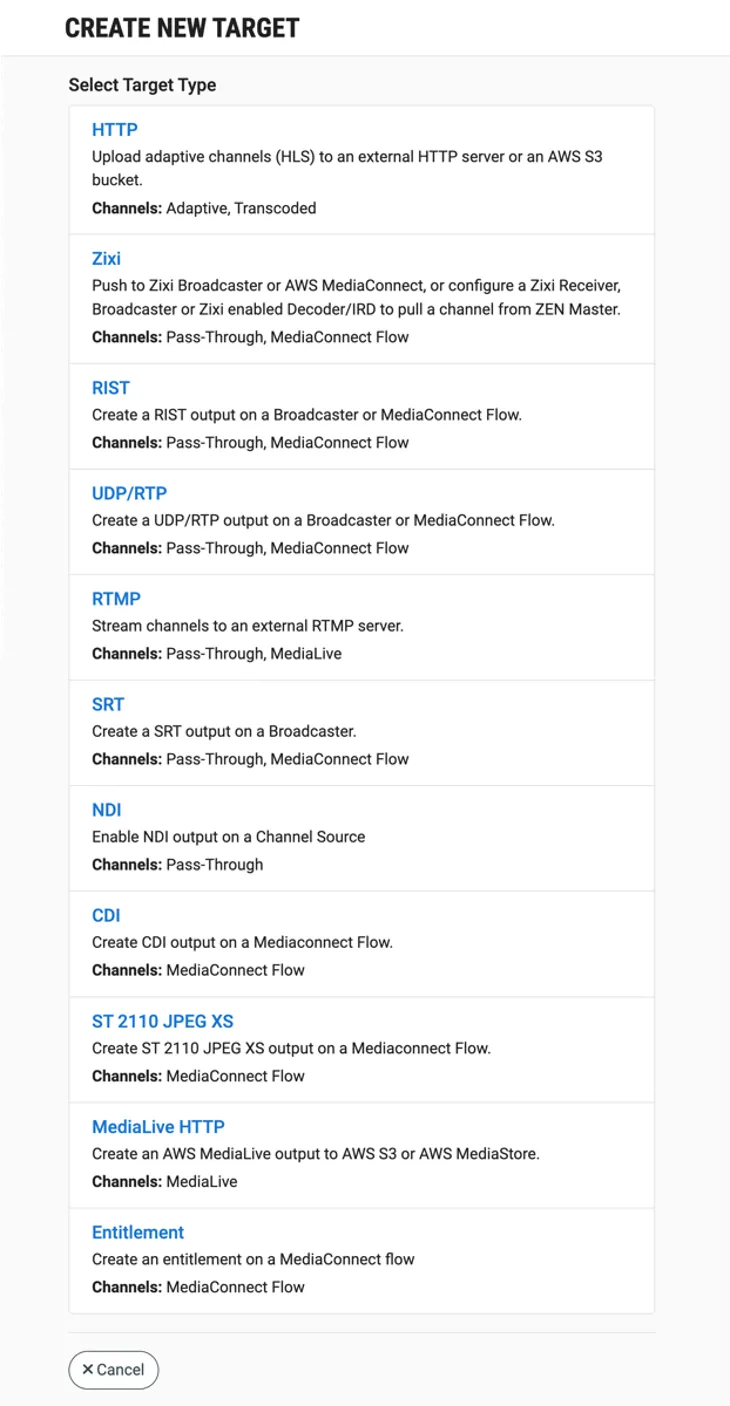
Click on Zixi. The Create New Zixi Target window is displayed.

In the Info section, in the Name field, enter a logical name for the MediaConnect target.
In the Tags field, select one or more of the predefined Tags from the drop-down list. Tags are used for access control. By selecting a Tag you are relating this target to that Tag. Tags are associated with certain roles (through the Users & Roles screen), and roles, in turn, are associated with users and user groups. If you would like to create a new Tag, see Creating a Tag .
In the Events Configuration Profile field, select from the dropdown list the profile that you would like to apply to this Target. By default, the Default profile is applied.
Events Profiles consist of a series of rules that determine precisely how various types of Events are logged and what results they trigger.
The Target's location is used to represent it in the proper position in the Map display (see Maps). By default, the location is determined automatically based on the Target's IP. If you would like to manually set the location of the Target (Optional), use the following procedure:
- Click on the Edit icon next to the Location field. A search box is shown below the Location field.
- Enter identifying info for the location (e.g. street address, zip code, coordinates). Search results are displayed below the search box as you type.
- Click on the desired location. The selected location populates the Location field.
In the Configuration section, in the Channel field, select from the drop-down list the channel that will be sent to the target. (Optional field)
The target will only become functional once a channel has been assigned to it. However, you can configure the target settings and then add a channel to the target after the initial configuration.
In the Type section, select MediaConnect. The fields relevant for MediaConnect Targets are shown.
The Channel Type is automatically set as ZEN Master Channel and can’t be changed.
In the Source Preference field, select one of the following options:
- Any Source – the Target will establish a connection to any available source in the Channel. Upon any disconnects with the current source, the Target will reconnect to another available source in the Channel.
- Primary Sources Only – the Target will establish and maintain connection to a source designated as Primary in the Channel. Upon loss of connection to that source, the Target will establish a connection to another available Primary source in the Channel.
- Backup Sources Only – the Target will establish and maintain connection to a source designated as Backup in the Channel. Upon loss of connection to that source, the Target will establish connection to another available Backup source in the Channel.
- Specific Source – select one of the specific sources listed. The Target will only establish a connection to the selected source and will not try to connect to any other source in the Channel.
It is not possible to select "Prefer Primary Sources" or "Prefer Backup Sources". This means you cannot have a Target failover from a Primary to a Backup source in the Channel unless "Any Source" is selected.
In the AWS Account field, select from the drop-down list the AWS account that you would like to set as the Target.
In the Region field, select from the drop-down list the AWS region of the MediaConnect flow that you would like to set as the Target.
In the AWS MediaConnect Flow field, select from the drop-down list the MediaConnect Flow that you would like to set as the Target.
In the Latency field, enter the latency in milliseconds.
In the Initial State section, select the Disabled checkbox if you would like to disable this Target upon initial configuration.
Select the Muted checkbox if you would like to disable error/recovery notifications for this Target upon initial configuration.
You can Enable/Unmute the Target at any time.
Under Protections, select the Channel reassignment protection chekbox if you want to prevent the reasssignment of this Target to another Channel. This is helpful in cases where you are switching the channel on multiple targets at once and can accidetaly select a Target that should not have been switched to the new Channel.
If you use POIS, expand the SCTE-35 Manipulation (POIS) section to see additional options:
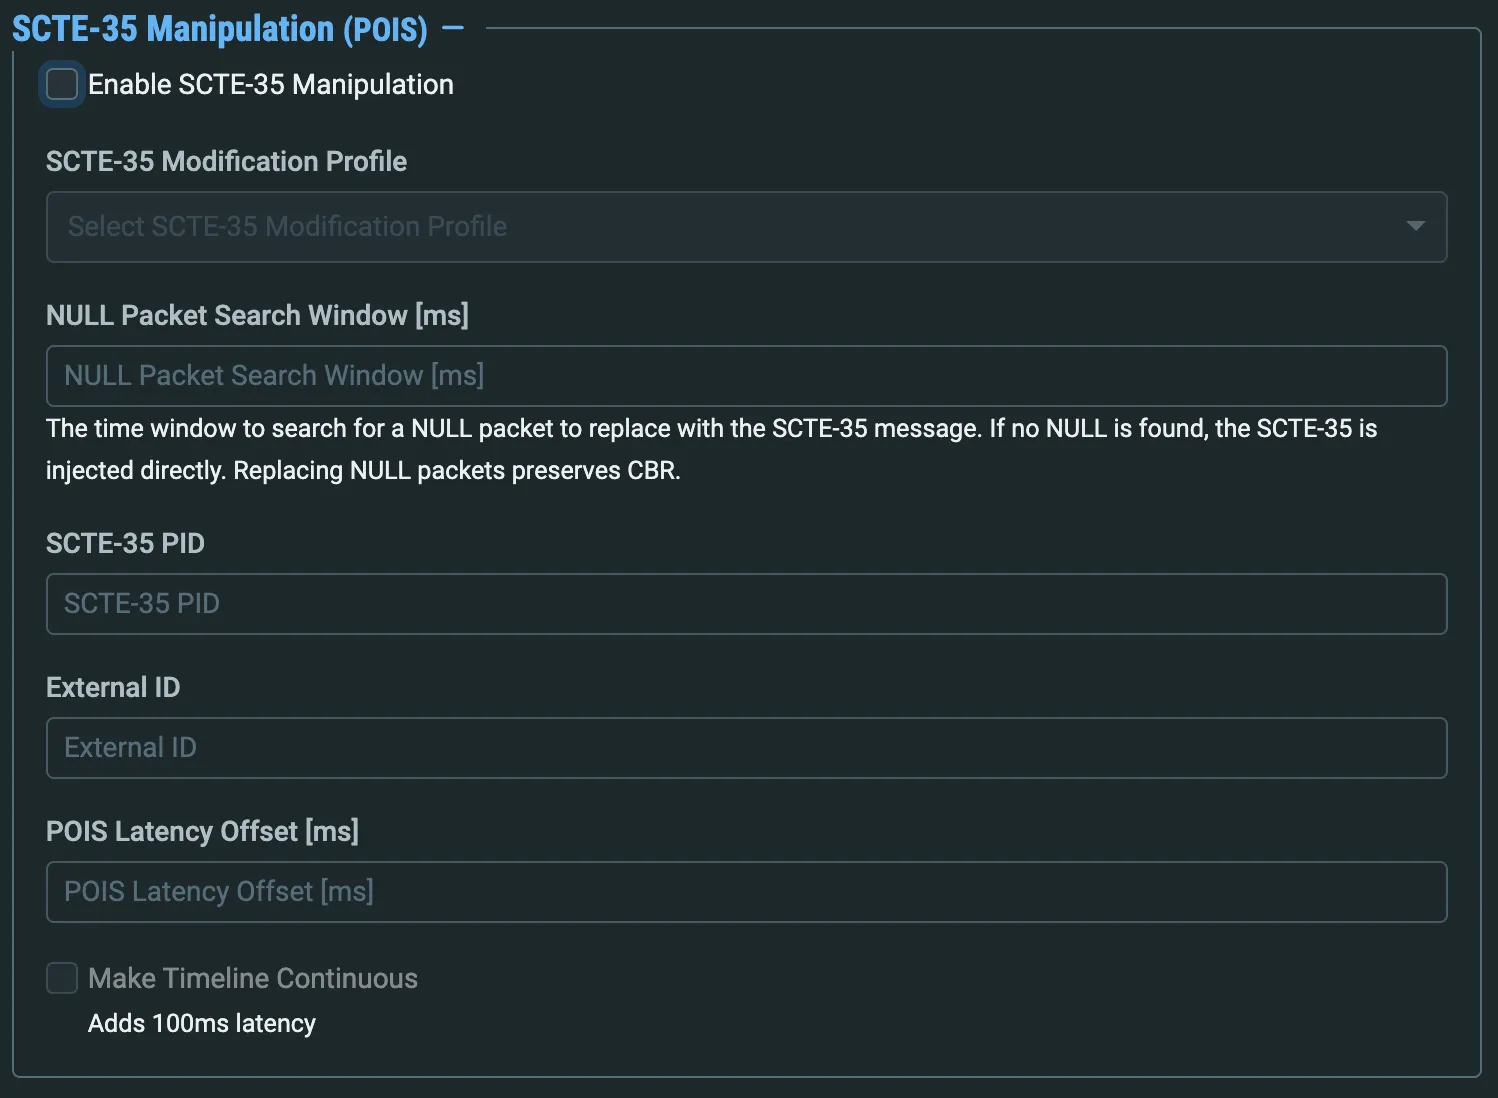
Select Enable SCTE-35 Manipulation to enable insertion and management of SCTE-35 messages (used typically to create ad breaks).
If you have created SCTE-35 Modification Profiles and want to apply it to this target, select it from the dropdown list. Note that if you select a profile, the Remove Existing SCTE-35 option will automatically be checked and non-editable - the way the modification works is that the Broadcaster will remove all SCTE-35 messages, and then re-insert them in original or modified form acccording to the rules defined in the profile.
Specify the time window in milliseconds of NULL packets to search for in order to insert SCTE-35 messages into the stream:
- If the stream is VBR, set the value to 0 - SCTE-35 messages can be inserted anywhere, and do not need a NULL packet
- If the stream is CBR, the downstream receiver may need a CBR stream. Inserting the SCTE-35 message into a NULL packet ensures the stream will remain CBR; however, it may delay the insertion of the message up to the length of the search window
Specify a specific PID number for SCTE-35 insertion.
If you are using an external POIS or ESNI system, enter the External ID that you use to reference the ZEN Master object in the other system. See the Parameters table below for more information.
In the POIS Latency Offset field, if you would like to offset the POIS modification path to allow for API latency, enter a value in miliseconds. This value can be zero, but it establishes that this output should receive POIS SCTE conditioning.
If you want the timeline adjusted (normalized) to account for insertion and/or removal of SCTE-35 messages, select Make Timeline Continuous (note that the processing will add approximately 100ms to latency).
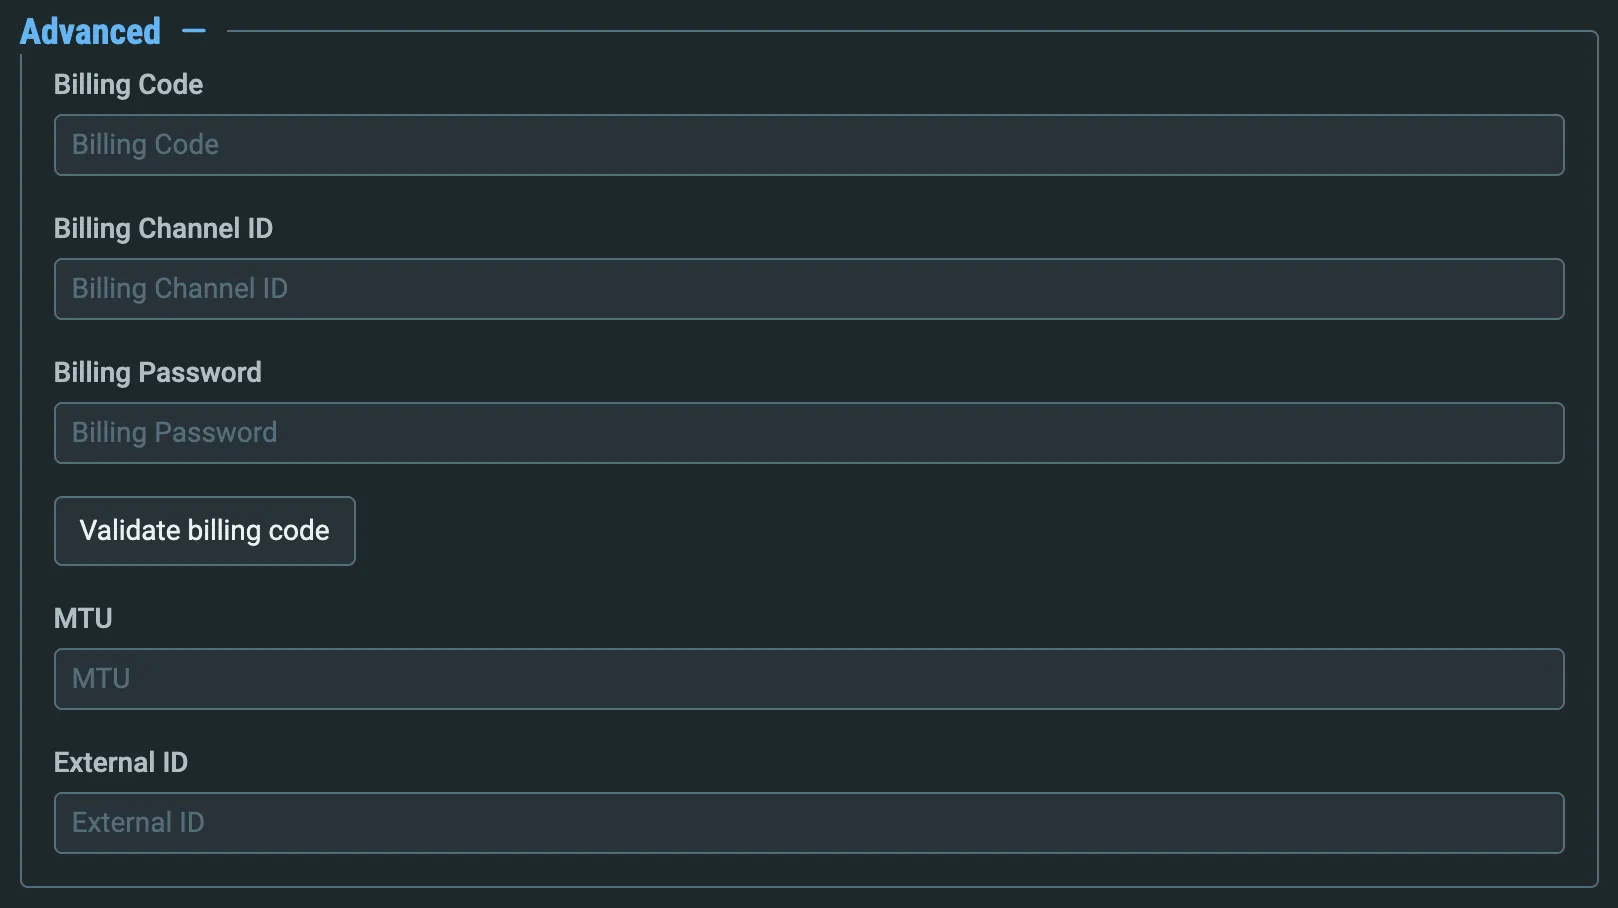
See the Parameters Table below for additional fields, including Advanced Settings:
Click Save.
AWS MediaConnect Target Configuration Parameters Table
Parameter | Description |
|---|---|
Info | |
Name | Specify a name for the AWS MediaConnect Target in ZEN Master. |
Tags | Select one or more of the predefined Tags from the drop-down list. Tags are used for access control. By selecting a Tag, you are relating this Target to that Tag. Tags are associated with certain roles (through the Users & Roles screen), and roles, in turn, are associated with users and user groups. If you would like to create a new Tag, see Creating a Tag. |
Events Configuration Profile | Select from the dropdown list the profile that you would like to apply to this Target. By default, the Default profile is applied. Note: Events Profiles consist of a series of rules that determine precisely how various types of Events are logged and what results they trigger. |
Location (Optional) | The Target's location is used to represent it in the proper position in the Map display (see Maps). By default, the location is determined automatically based on the Target's IP. Enter identifying info for the location (e.g. street address, zip code, coordinates) and select the desired location from the suggestions that are shown. |
Configuration | |
Type | Select AWS MediaConnect. |
Channel | Select from the drop-down list the Channel that will be sent to the Target. Note: The Target will only become functional once a Channel has been assigned to it. However, you can configure the Target settings and then add a Channel to the target after the initial configuration. |
Source Preference | Select from the drop-down list one of the following:
Note: It is not possible to select "Prefer Primary Sources" or "Prefer Backup Sources". This means you cannot have a Target failover from a Primary to a Backup source in the Channel unless "Any Source" is selected. |
AWS Account | Select from the drop-down list the AWS account that you would like to set as the Target. |
Region | Select from the drop-down list the AWS region of the MediaConnect flow that you would like to set as the Target. |
AWS MediaConnect Flow | Select from the drop-down list the MediaConnect Flow that you would like to set as the Target. |
Latency | Enter the latency in milliseconds. |
Initial State | |
Disabled | Select this checkbox if you would like to disable this Target upon initial configuration. |
Muted | Select this checkbox if you would like to disable error/recovery notifications for this Target upon initial configuration. |
| |
Protections | |
Channel reassignment protection | Select this option if you want to prevent the reasssignment of this Target to another Channel. This is helpful in cases where you are switching the channel on multiple targets at once and can accidetaly select a Target that should not have been switched to the new Channel. |
SCTE-35 Manipulation (POIS) | |
Enable SCTE-35 Manipulation | Select to enable insertion and management of SCTE-35 messages (used typically to create ad breaks). |
NULL Packet Search Window (ms) | Specify the time window in milliseconds of NULL packets to search for in order to insert SCTE-35 messages into the stream:
Note: in Broadcasters prior to v19, if the value is set to anything other than 0, the search window will be 2 seconds. |
SCTE-35 PID | Specify a specific PID number for SCTE-35 insertion. |
Remove Existing SCTE-35 | Select if you wish to override all existing SCTE-35 messages with your own. |
External ID | The ID that is used when integrating ZEN Master with an external ESNI/ESAM server. The ID is whatever you use in the external system to reference the ZEN Master object, though depending on what you are doing, it might serve different purposes:
Regardless, the External ID is the same whether entered in the SCTE-35 Manipulation settings or the Advanced settings, and you cannot enter different values in the two fields. |
POIS Latency Offset [ms] | If you would like to offset the POIS modification path to allow for API latency, enter a value in miliseconds. This value can be zero, but it establishes that this output should receive POIS SCTE conditioning. |
Make Timeline Continuous | Select this option to normalize the timeline, making it continuous. Note that it will add 100ms latency and it creates a variant of the input, which means that it doubles your input. |
Advanced Settings | |
Billing Code | If you would like to track usage for this Target, enter your Billing Code details, see Billing Codes . (Supported for Broadcasters v14.8+) |
Billing Channel ID | An optional arbitrary string - you can enter anything you want to for your record-keeping. This is not related to ZEN Master Channels. |
Billing Password | Enter the password that corresponds to this billing code. |
MTU | Specify the maximum transmission unit (largest data packet that a network-connected device will accept) in bytes. |
External ID | The ID that is used when integrating ZEN Master with an external ESNI/ESAM server. The ID is whatever you use in the external system to reference the ZEN Master object, though depending on what you are doing, it might serve different purposes:
Regardless, the External ID is the same whether entered in the SCTE-35 Manipulation settings or the Advanced settings, and you cannot enter different values in the two fields. |