Adding a Zixi Source – Broadcaster Pull
Adding a Zixi Source – Broadcaster Pull
You can add an input from a Zixi Broadcaster to a Broadcaster cluster to be managed as a source in ZEN. This is done by selecting Zixi in the New Source menu. You can use either Push or Pull method to send the Source from the Broadcaster. In this case, the Broadcaster is referred to as the Origin Broadcaster which streams to the Ingest Broadcaster.
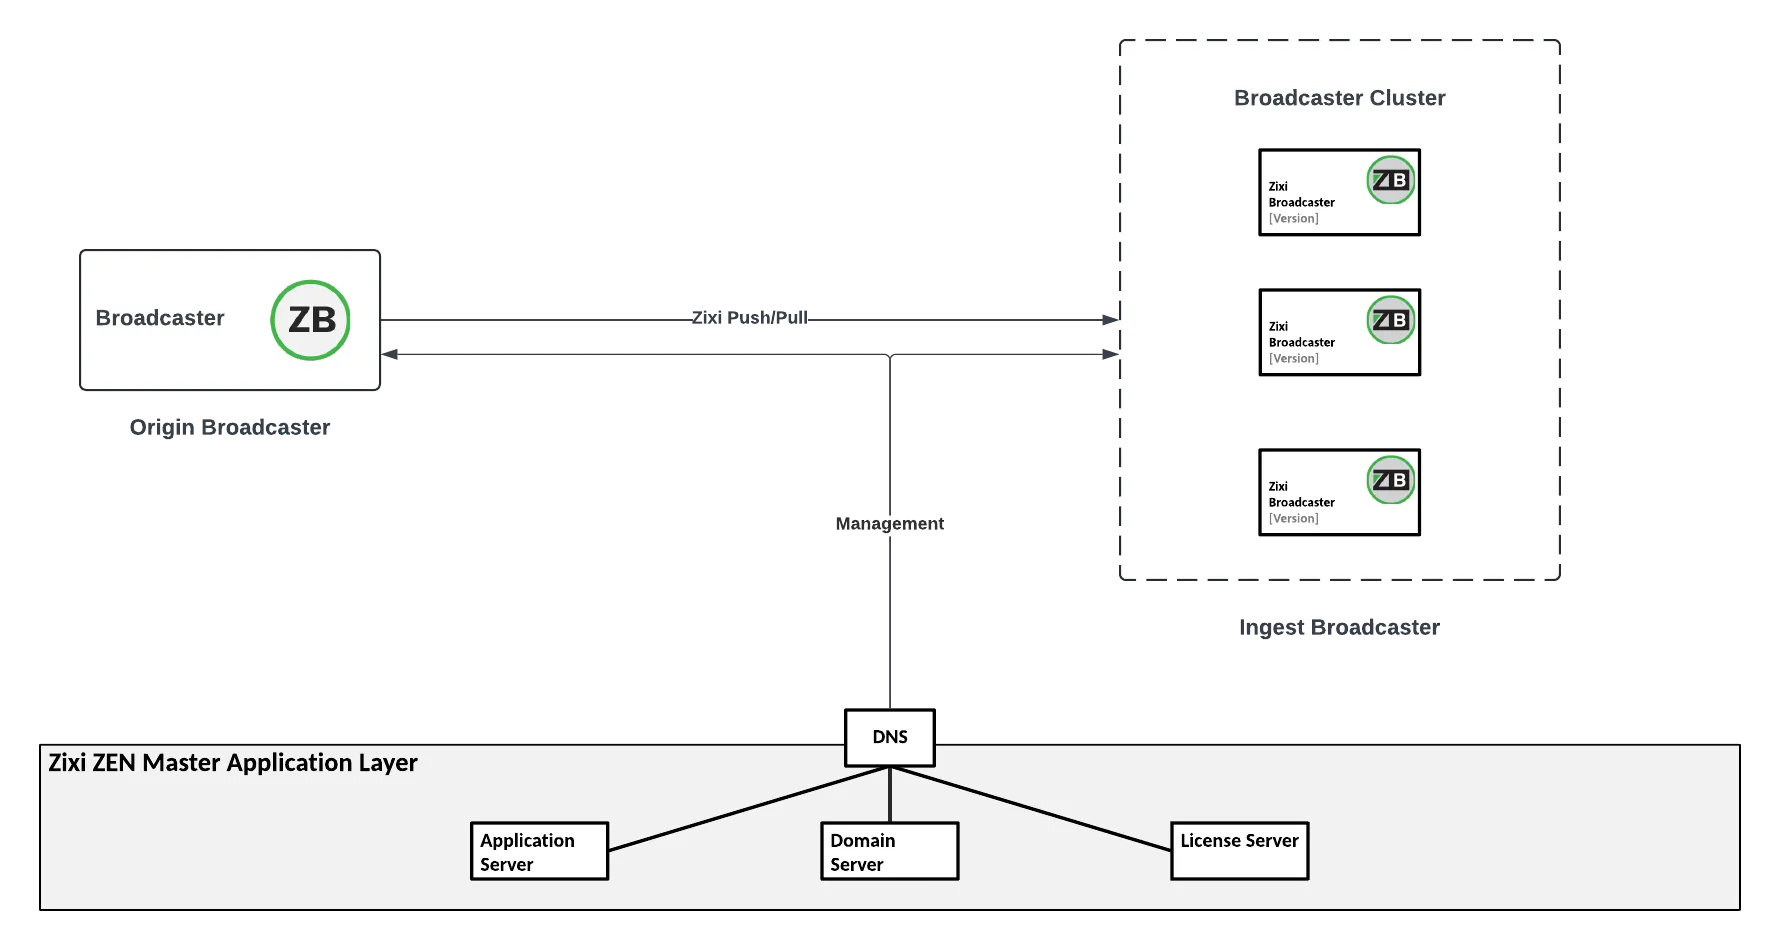
The following procedure describes how to add a Zixi Broadcaster Zixi Pull source in ZEN Master. In addition, an explanation of each of the configuration parameters is given in the table below.
Also see Adding a Zixi Source – Broadcaster Push
To add a Broadcaster Push Source:
In the main navigation, click Sources.
Click + Add. The Create New Source selection window is displayed.
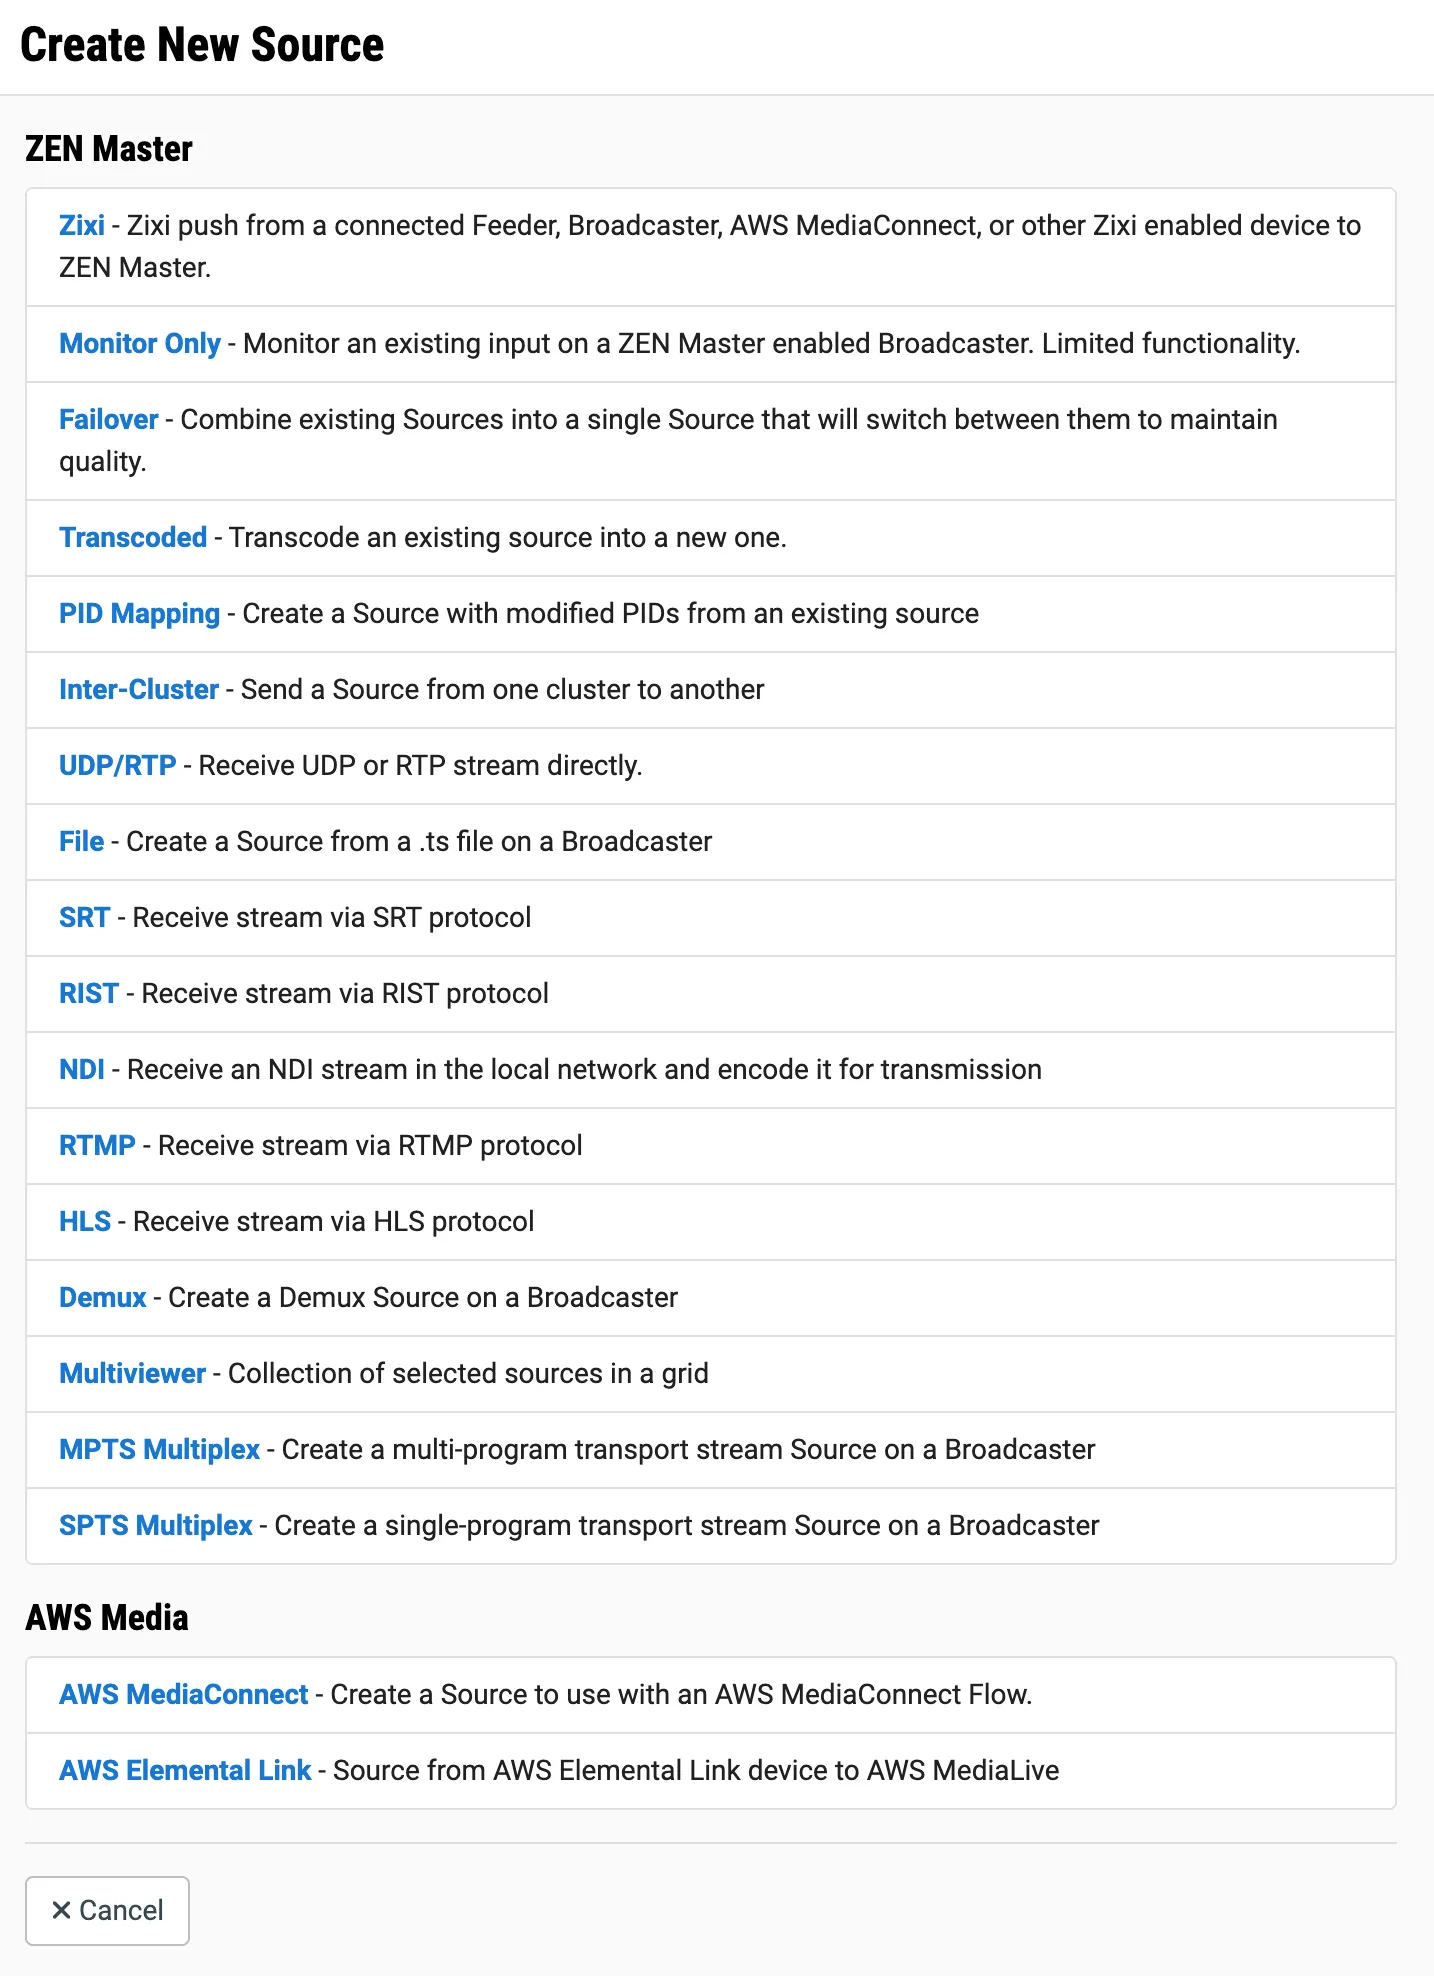
Click on Zixi. The Create Zixi Source window opens.

Be sure to set the Mode to Pull and the Application to Broadcaster to get the correct fields.
In the Info section, in the Name field, type a logical name for the Zixi source.
In the Tags field, select one or more of the predefined Tags from the drop-down list. Tags are used for access control. By selecting a Tag, you are relating this Source to that Tag. Tags are associated with certain roles (through the Users & Roles screen), and roles, in turn, are associated with users and user groups. If you would like to create a new Tag, see Creating a Tag.
In the Events Configuration Profile field, select from the dropdown list the profile that you would like to apply to this Source. By default, the Default profile is applied.
Events Profiles consist of a series of rules that determine precisely how various types of Events are logged and what results they trigger.
The Source's location is used to represent it in the proper position in the Map display (see Maps). By default, the location is determined automatically based on the Source's IP. If you would like to manually set the location of the Source (Optional), use the following procedure:
- Click on the Edit icon next to the Location field. A search box is shown below the Location field.
- Enter identifying info for the location (e.g. street address, zip code, coordinates). Search results are displayed below the search box as you type.
- Click on the desired location. The selected location populates the Location field.
In the Broadcaster field, select from the drop-down list one of the available Broadcasters.
Use the following procedure to configure the input:
- In the Host field, enter the IP address of the Broadcaster from which the stream is being pulled.
- If you have an alternative host for backup, enter that IP address in the Alt Host field.
- In the Port field, enter the port through which the Broadcaster receives the stream from another Broadcaster server. Default: 2088
The default input port for Zixi Broadcaster is UDP port 2088. This port must be open on any firewalls between Zixi Broadcaster and other devices it is communicating with.
- In the Stream ID field, enter the precise Stream ID (case sensitive) assigned to this stream on the input broadcaster.
- If you are using a password for this stream, in the Password field, enter the string for authentication. It must be identical to the string configured on the input broadcaster.
In the Configuration section, in the Ingest Cluster field, select from the drop-down list one of the available Ingest Clusters as the destination for the Source.
In the Target Broadcaster/s field, select your broadcaster preferences. Either select a specific broadcaster to be used OR specify your preference for using primary vs. backup broadcasters, options are: Prefer Primary Broadcasters, Primary Broadcasters only, Backup Broadcasters only or Prefer Backup Broadcasters.
For managed clusters, it is not recommended to select a specific broadcaster, as the broadcaster’s availability may not remain stable.
In the Latency [ms] field, select the latency time for the stream (default 4000).
If you would like to enable the Zixi auto encryption feature for encrypting the source stream, select the Enable Encryption checkbox.
If you would like to apply a PID Mapping profile to this Source, then in the PID Mapping Profile field, select the desired profile from the dropdown list.
Using this method creates a single Source in ZEN Master with PID Mapping applied. If you would like to maintain a Source with the original PIDs and create an additional Source with PID Mapping (e.g. if you want to create several different PID Mapped variations), then use the method described in Adding a Source - PID Mapping. To create a new PID Mapping Profile, see PID Mapping Profiles.
If you would like to generate email notifications whenever a PID change is detected, select the Alert on PID changes checkbox.
Check the Minimize Latency checkbox to enable Dynamic Latency (see Latency Considerations for more information about Dynamic Latency).
Select the Log SCTE-35 checkbox if you would like to log SCTE-35 markers for this stream.
- To log SCTE-35 markers, SCTE-35 needs to be enabled both on the Ingest Cluster and on the Source configuration.
- SCTE-35 logging is only available for v13.1.40262+ Broadcasters.
If Log SCTE-35 was selected, you can choose to receive alerts for SCTE-35 markers by selecting the Enable SCTE-35 alerts checkbox.
In the Public Output field, if you would like to allow access to the stream directly through a supported player, select the Allow checkbox.
If you selected the Allow checkbox, then enter a password in the Password field to authenticate access to the stream.
Under Content Analysis select one of the following options:
- Full - select this option if you would like to enable full Content Analysis (CQA), including analysis of the stream's audio and video content, including audio levels, audio silence detection, frozen video detection, and more.
- TR101 Only - select this option to perform TR101 analysis only (without video and audio content analysis). The analysis can be used to check the integrity of the TS and the most important elements of the stream. The analysis includes priority 1 and 2. To learn more about TR101 analysis see TR 101 290 Technical Report.
- None - no content analysis is enabled.
It is generally recommended to enable full Content Analysis unless it is causing technical problems. If Content Analysis is disabled, the system won't detect errors in the video and audio content of the stream and won't generate warnings for such events.
If you would like to monitor CEA-608 and/or CEA-708 closed captions, select the Monitor CEA-608 and/or CEA-708 checkbox.
Note: Broadcaster versions earlier than v18 will not distinguish between 608 and 708 captions.
If you would like to disable auto-pull, select the Disable Auto-Pull checkbox.
Disabling Auto-Pull will lock Channels using this Source to the Source's Ingest Cluster and Targets to the Source's current active Broadcaster. This setting only applies to Pass-Through Channels.
If Auto-Pull is enabled, in the Auto-Pull Latency [ms] field, specify the maximum latency for auto-pull actions. The Broadcaster will update the latency as required, by using the maximal defined latency and then reducing the latency gradually. (Default: 1000 ms)
If Pull was selected in step 7 and the Source is using AES encryption, in the Decryption Key field, enter the static key that was used for encryption.
In the WebRTC Playback section, select the desired playback method.
WebRTC enables you to monitor the stream via web browsers and mobile applications with real-time communication (RTC). WebRTC needs to be activated independently for each Source in ZEN Master (by default it is disabled).
Select one of the following options:
- Disabled - users will not be able to view this Source using WebRTC (default)
- Pass-Through - passes the stream through to WebRTC without transcoding. This option can only be used if the input stream is already in a WebRTC compliant format (video - H.264 codec with Baseline or Main profile and no B frames, Audio - Opus codec).
- Auto - ZEN Master automatically transcodes the stream using the optimal profile for each specific user. In this option Zixi Broadcaster will decode the video, transforming it into RAW frames, which will be passed to the WebRTC library, where it will be re-encoded for each individual user.
Best quality. However, if monitored by multiple users this can consume extensive resources.
- 1080p/720p/480p/360p - ZEN Master transcodes the stream to a WebRTC compliant profile with the specified resolution. The transcoding is done by Zixi Broadcaster's transcoder.
This method requires a Zixi Broadcaster with X264 or Nvidia for transcoding. This method allows many users to monitor the stream without encoding separately for each individual user, which saves CPU capacity. Since there is only one stream version, it is recommended to encode to a low resolution and low bitrate so that the stream will be viewable by all users monitoring the stream.
If you want to insert SCTE-35 messages into the stream, expand the SCTE-35 Manipulation section to expose the fields:

Check Enable SCTE-35 Manipulation to enable insertion and other management of SCTE-35 messages
Set the NULL Packet Search Window if needed - factors to consider:
- If the stream is VBR, set the value to 0 - SCTE-35 messages can be inserted anywhere, and do not need a NULL packet
- If the stream is CBR, the downstream receiver may need a CBR stream. Inserting the SCTE-35 message into a NULL packet ensures the stream will remain CBR; however, it may delay the insertion of the message up to the length of the search window
You can also specify a specific SCTE-35 PID number.
If you want to ensure that your inserted SCTE-35 messages are the only ones, you can elect to remove any pre-existing ones from the stream
In the Initial State section, select the Disabled checkbox if you would like to disable this Source upon initial configuration.
Select the Muted checkbox if you would like to disable error/recovery notifications for this Source upon initial configuration.
You can Enable/Unmute the Source at any time.
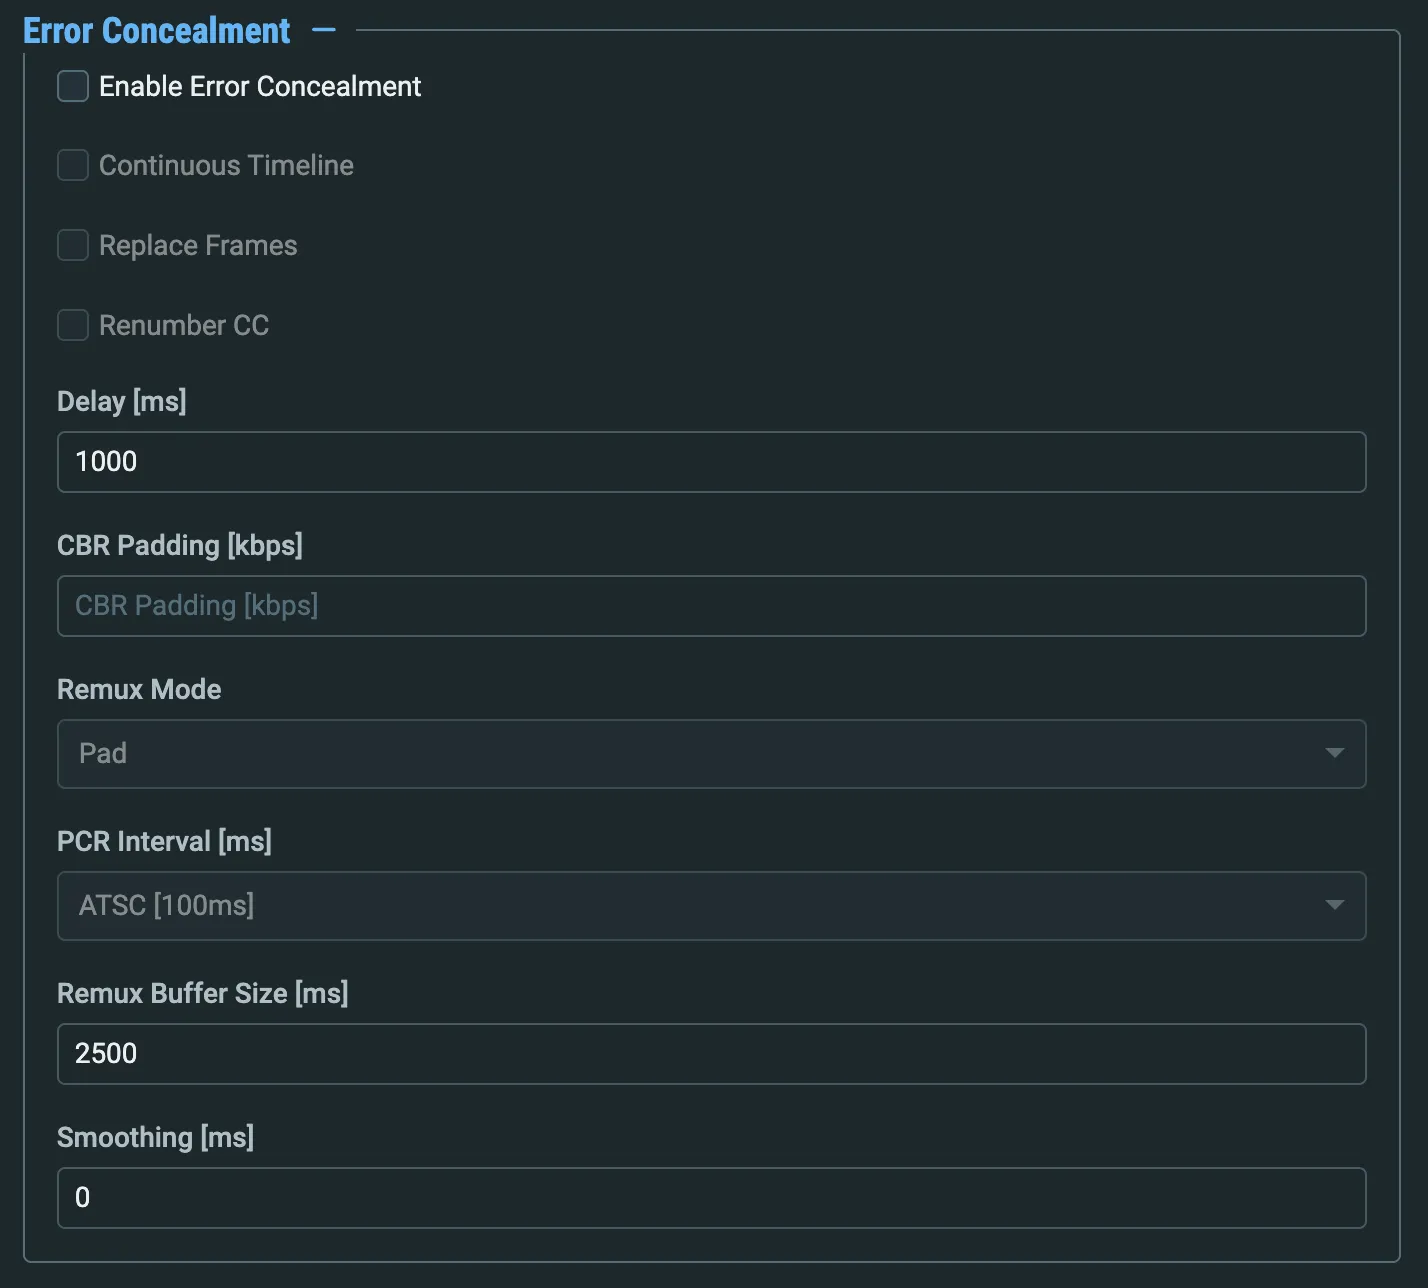
Under Error Concealment, click the Enable Error Concealment checkbox to enable the following error concealment mechanisms that can correct transaport stream for downstream IRDs:
1. Continuous Timeline - corrects errors that are related to timeline jumps in the source. This mechanism will normalize the timeline by creating a variant of the input (the input is doubled) and normalizing the timeline of the doubled input.
2. Replace Frames - If there are frames with CC errors, it replaces them with skip frames (inserts the last good frame received in place of missing ones). This solves issues such as an IRD that lost synchronization when it received broken frames. This mechanism also creates a variant of the input (doubling the input).
3. Renumber CC - The Continuity Counter is part of the TS encapsulation. When there are CC errors in TR101 analysis it means that the counter has a gap due to the lost frames. This mechanism can re-write the CC counter for the downstream devices, so they will see a continuous increase of the counter.
4. Delay (ms) - Enter the delay that the Error Concealment adds to the stream in miliseconds. Error Concealment needs to buffer the stream to analyze it. One second is a reasonable value. Lower values may cause the Error Concealment to not be able to fix some of the frames.
5. CBR Padding - enter a value for the rate at which padding will be added to maintain a specific output transport bitrate. For example, if you have a video bitrate at 5000 kbps or that varies from 3000-5000 kbps and audio at 64 kbps, total bitrate will be max 5064 kbps or min 3064 kbps. With CBR padding set at 6000 kbps, 6000 kbps is being delivered downstream at all times, ensuring a consistent bitrate.
6. PCR Interval - Select the frequency at which Program Clock Reference is inserted into the outputs Transport stream. This depends on standard used by downstream encoders or decoders. Options include:
- ATSC standard - 100 ms
- DVB standard - 40 ms
- Remux Buffer Size - Specify the time added for remuxing the stream (default: 2500 ms).
- Smoothing - Time added for smoothing a bursty stream - adds to latency, but produces a smoother output.
See Improving Stream Resiliency: Error Correction and Concealment for more information.
If you would like to adjust the advanced settings, click Advanced. The Advanced settings fields are displayed.
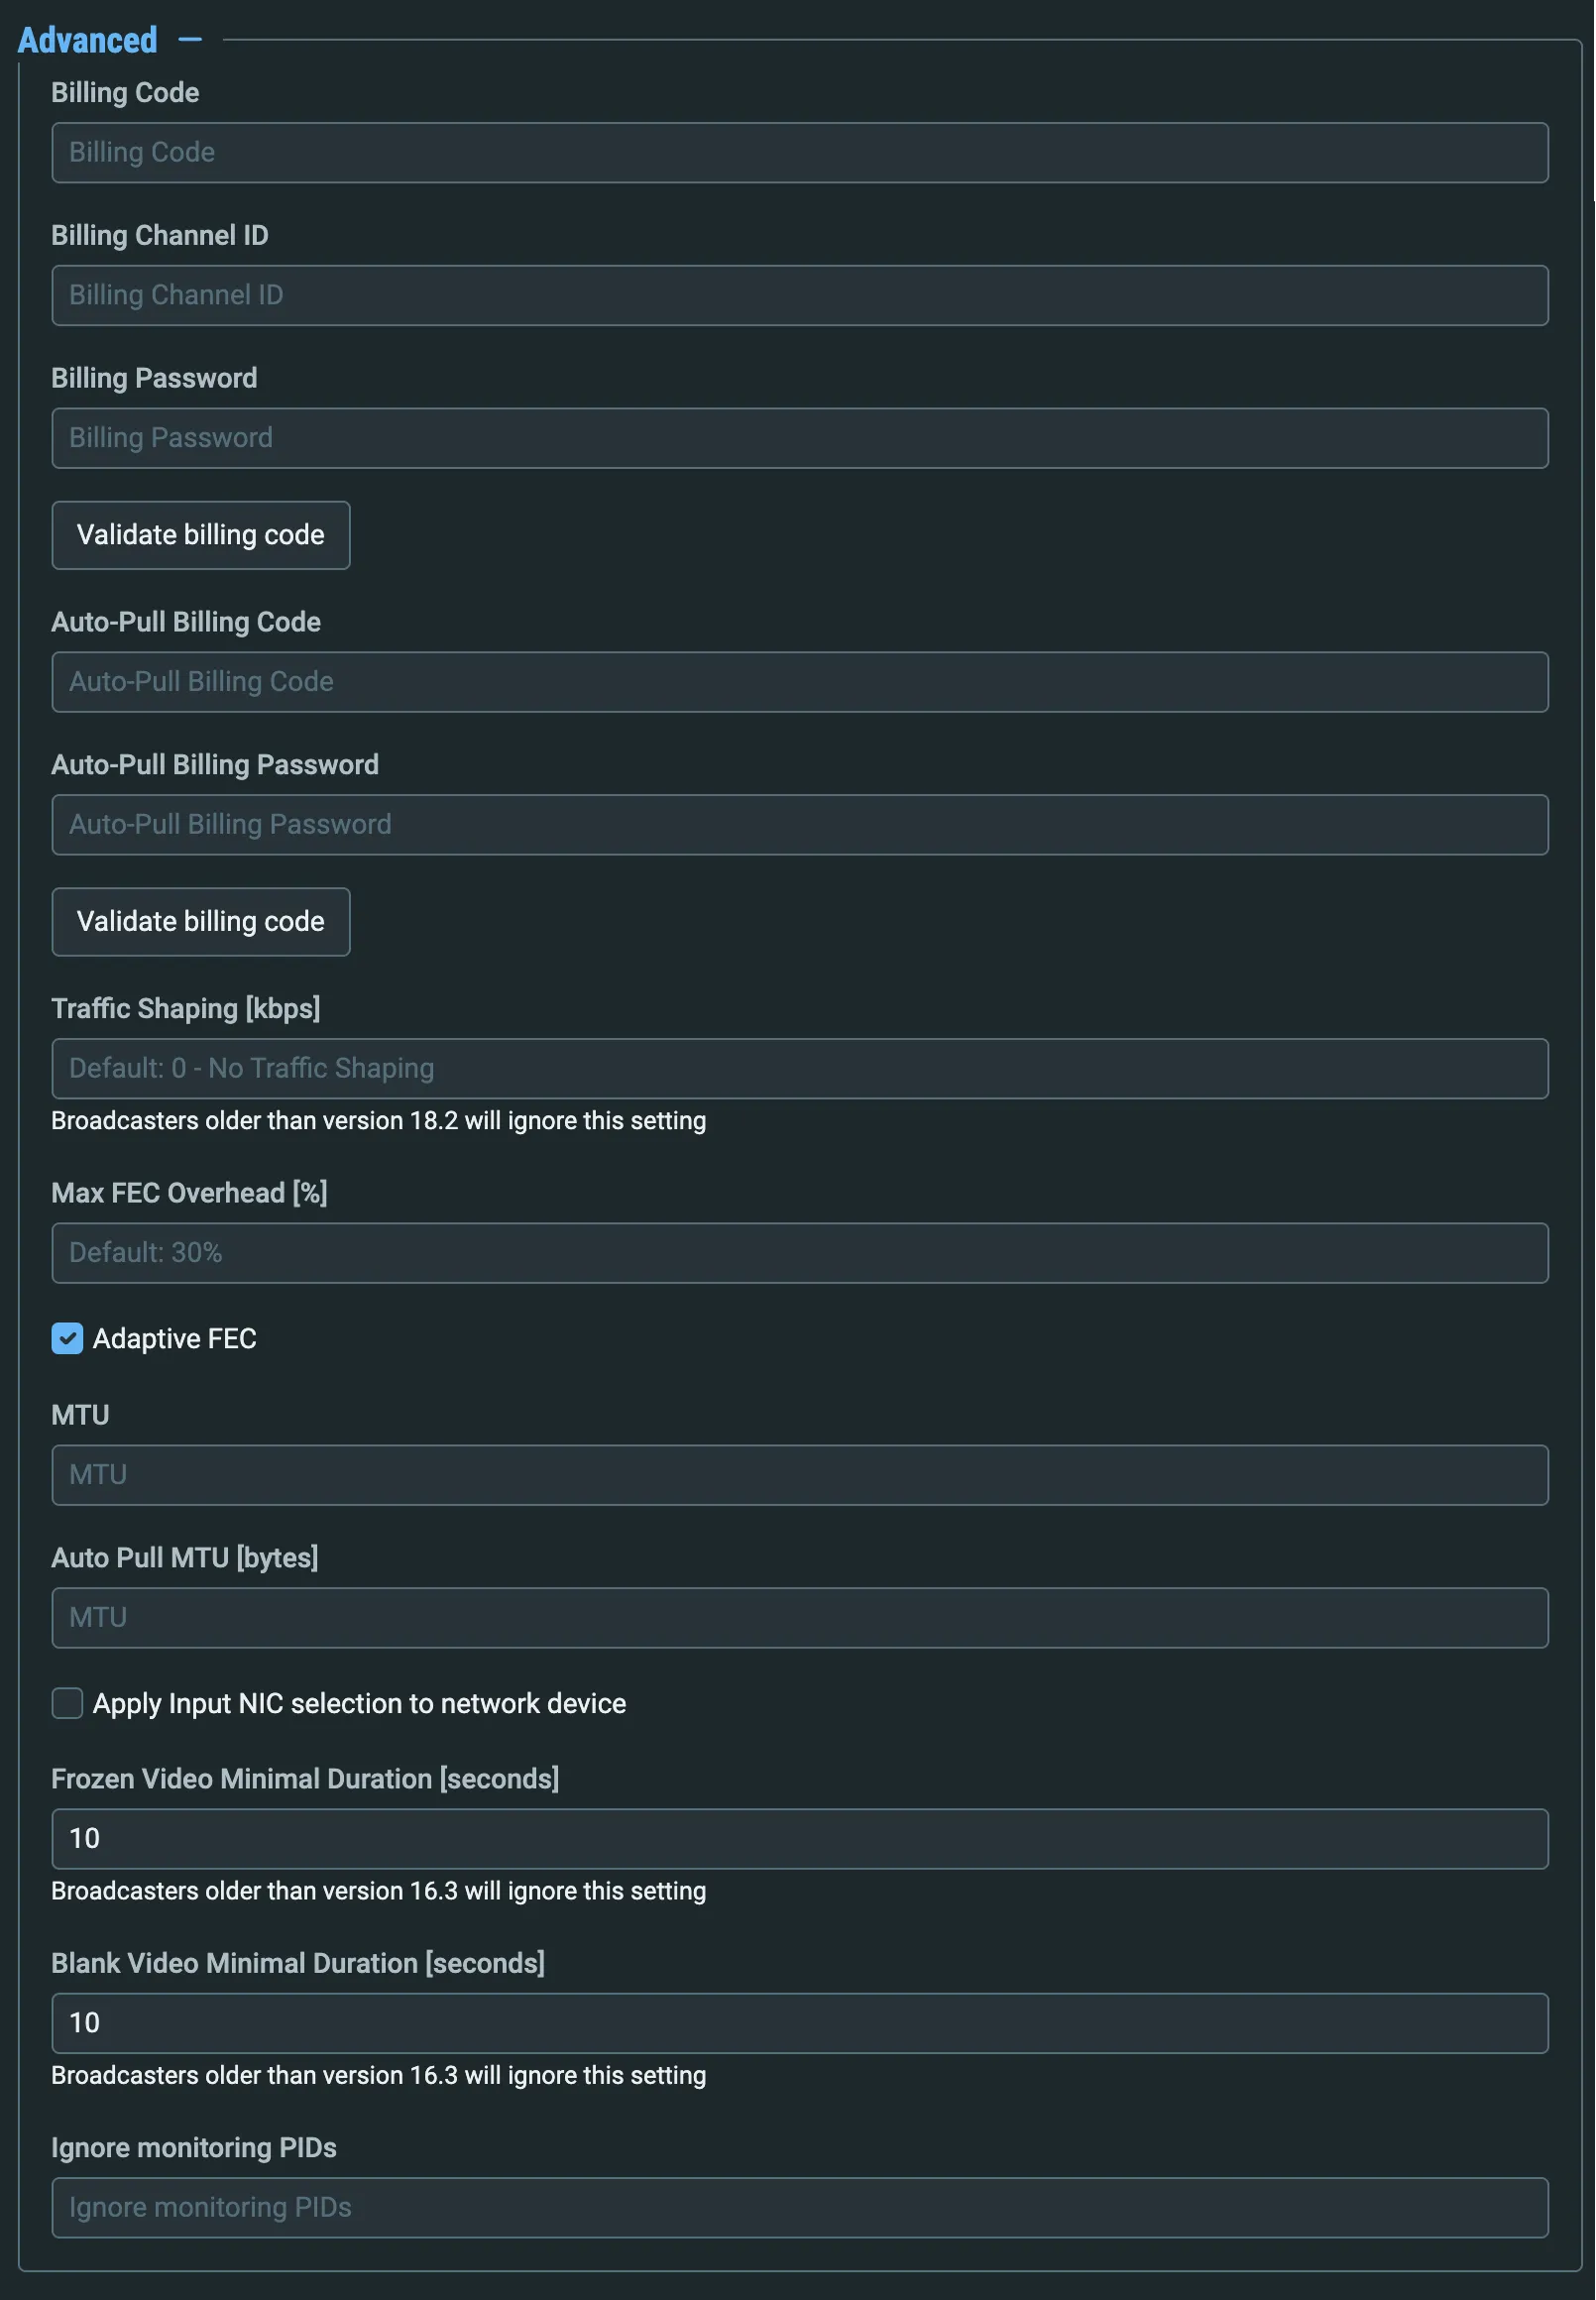
If you would like to track usage for this Source, enter your Billing Code details. See Billing Codes.
If you would like to track auto-pull usage separately, enter you Auto-Pull Billing Code details.
For either or both billing codes, click the Validate billing code button to verify that the code is valid.
Traffic shaping is a network management technique used to control and optimize the flow of data. Check the box to enable it (this setting will be ignored for Broadcasters earlier than v18.2).
FEC (Forward Error Correction) helps to fix transmission problems by sending redundant data that will allow reconstruction of lost packets instantly. By default the redundant data is limited to 30% of the actual data stream, but you can set the percentage to a lower value (this setting will be ignored for Broadcasters earlier than v18.2).
Adaptive FEC improves the efficiency of FEC by adjusting the amount of extra data sent according to network conditions. By default Adaptive FEC is turned on, but there are some cases where fixed FEC is needed and you will want to disable it.
Note that if the you disable Adaptive FEC and later disable and reenable the source, Adaptive FEC will be turned on again, and you will need to edit the source and disable it again.
Frame Thinning allows non-critical frames to be dropped to reduce latency - check the box to enable it. Note: this option is available for Push sources only coming for Broadcaster 18.2 or later.
In the Auto Pull MTU field, specify the maximum transmission unit (largest data packet that a network-connected device will accept) in bytes for the Auto Pull.
To set the detection of frozen video, in the Frozen Video Minimal Duration field, specify the default minimal duration in seconds of frozen video after which the Broadcaster will trigger a Frozen video alert. Default: 10 seconds. This setting is supported for Broadcaster version 16.3 and higher.
To set the detection of blank video, in the Blank Video Minimal Duration field, specify the default minimal duration in seconds of blank video after which the Broadcaster will trigger a Blank video alert. Default: 10 seconds. This setting is supported for Broadcaster version 16.3 and higher.
See the Parameters Table below for additional advanced fields.
Click Save.
Zixi Broadcaster Source Configuration Parameters Table
Parameter | Description |
|---|---|
Info | |
Name | Specify a name for the Zixi Source in ZEN Master. |
Tags | Select one or more of the predefined Tags from the drop-down list. Tags are used for access control. By selecting an Tag, you are relating this Source to that Tag. Tags are associated with certain roles (through the Users & Roles screen), and roles, in turn, are associated with users and user groups. If you would like to create a new Tag, see Creating a Tag . |
Events Configuration Profile | Select from the dropdown list the profile that you would like to apply to this Source. By default, the Default profile is applied. Note: Events Profiles consist of a series of rules that determine precisely how various types of Events are logged and what results they trigger. |
Location (Optional) | The Source's location is used to represent it in the proper position in the Map display (see Maps). By default, the location is determined automatically based on the Source's IP. Enter identifying info for the location (e.g. street address, zip code, coordinates) and select the desired location from the suggestions that are shown. |
Input | |
Mode | To create a Zixi Broadcaster Source, select the mode used for sending the Source. Choose Pull. |
Application | To create a Zixi Broadcaster Source, select the Broadcaster radio button. |
For Pull Mode | |
Host | Enter the IP address of the Broadcaster from which the stream is being pulled. |
Port | Enter the port through which the Broadcaster receives the stream from another Broadcaster server. Default: 2088 The default input port for Zixi Broadcaster is UDP port 2088. This port must be open on any firewalls between Zixi Broadcaster and other devices it is communicating with. |
Stream ID | Enter the precise stream ID (case sensitive) assigned to this stream on the input broadcaster. |
Password | If you are using a password for this stream, enter the string for authentication. It must be identical to the string configured on the input broadcaster. |
Configuration | |
Ingest Cluster | Select from the drop-down list one of the available Ingest Clusters as the destination for the Source. |
Target Broadcaster/s | Specify which Broadcaster/s within the cluster on which ZEN Master can deploy the source. Either select a specific Broadcaster to be used OR specify your preference for using primary vs. backup Broadcasters. Options are: Prefer primary Broadcasters, Primary Broadcasters only, Backup Broadcasters only or Prefer Backup Broadcasters. Note: For managed clusters, it is not recommended to select a specific Broadcaster, as the Broadcaster’s availability may not remain stable. |
Input NIC (Pull) | If you would like to specify which NIC is used, then select the IP of that NIC from the drop-down list. By default, Any is selected.
|
Latency [ms] | Select the latency time for the stream (default 4000). |
Enable Encryption | If you would like to enable the Zixi auto encryption feature for encrypting the Source stream, select this checkbox. |
PID Mapping (Optional) | If you would like to apply a PID Mapping profile to this Source, then select the desired profile from the dropdown list. To create a new PID Mapping Profile, see Adding PID Mapping Profiles. Note: Using this method creates a single Source in ZEN Master with PID Mapping applied. If you would like to maintain a Source with the original PIDs and create an additional Source with PID Mapping (e.g. if you want to create several different PID Mapped variations), then use the method described in Adding a Source - PID Mapping . |
Alert on PID changes | If you would like to generate email notifications whenever a PID change is detected, select this checkbox. |
Minimize Latency | Let Zixi adjust latency dynamically to optimize it for network conditions - see Latency Considerations for more information. |
Log SCTE-35 | Select this checkbox if you would like to log SCTE-35 markers for this stream. Note: To log SCTE-35 markers, SCTE-35 needs to be enabled both on the Ingest Cluster and in the Source configuration. Note: SCTE-35 logging is only available for v13.1.40262+ Broadcasters. |
Enable SCTE-35 alerts (for Log SCTE-35) | If you would like to receive alerts for SCTE-35 markers, select this checkbox. |
Public Output | If you would like to allow access to the stream directly through a supported player, select the Allow checkbox. |
Password (for Public Output) | If you selected Allow in the Public Output field, specify a password in this field to authenticate access to the stream. |
Content Analysis | Select one of the following options:
|
Hide Thumbnail | Select this option to hide the Source's thumbnail from where it is displayed (e.g., the Preview Pane, Grids, etc.). |
Monitor CEA-608/CEA-708 Closed Captions | If you would like to monitor CEA-608/CEA-708 closed captions, select this checkbox. Note: Monitoring CEA-608/CEA-708 Closed Captions requires using a version 14.4 or newer Broadcaster. |
Monitor CEA-608/CEA-708 Closed Captions | If you would like to monitor CEA-608/CEA-708 closed captions, select this checkbox. Note: Monitoring CEA-608/CEA-708 Closed Captions requires using a version 14.4 or newer Broadcaster. |
Disable Auto-Pull | If you would like to disable auto-pull, select this checkbox. Note: Disabling Auto-Pull will lock Channels using this Source to the Source's Ingest Cluster and Targets to the Source's current active Broadcaster. This setting only applies to Pass-Through Channels. |
Auto-Pull Latency [ms] | Specify the maximum latency for auto-pull actions. The Broadcaster will update the latency as required, by using the maximal defined latency and then reducing the latency gradually. (Default: 1000 ms) |
Decryption Key (for Pull) | If the Source is using AES encryption, enter the static key that was used for encryption. |
WebRTC Playback | Select the desired playback method. Note: WebRTC enables you to monitor the stream via web browsers and mobile applications with real-time communication (RTC). WebRTC needs to be activated independently for each Source in ZEN Master (by default it is disabled). Select one of the following options:
Note: Best quality. However, if monitored by multiple users this can consume extensive resources.
Note: This method requires a Zixi Broadcaster with X264 or Nvidia for transcoding. This method allows many users to monitor the stream without encoding separately for each individual user, which saves CPU capacity. Since there is only one stream resolution, it is recommended to encode to a low resolution and low bitrate so that the stream will be viewable by all users monitoring the stream. |
SCTE-35 Manipulation | |
Enable SCTE-35 Manipulation | Enable insertion and other management of SCTE-35 messages (used typically to create ad breaks) |
NULL Packet Search Window (ms) | Look for a NULL packet to insert SCTE-35 messages into the stream
|
SCTE-35 PID | Specify a specific PID number for SCTE-35 insertion |
Remove Existing SCTE-35 | If you wish to override any existing SCTE-35 messages with your own, you can elect to have existing ones removed |
Initial State | |
Disabled | Select this checkbox if you would like to disable this Source upon initial configuration. |
Muted | Select this checkbox if you would like to disable error/recover notifications for this Source upon initial configuration. |
Error Concealment | |
Enable Error Concealment | Select this checkbox to enable the error concealment mechanisms listed below to correct transport stream for downstream IRDs. |
Continuous Timeline | Corrects errors that are related to timeline jumps in the source. This mechanism will normalize the timeline by creating a variant of the input (the input is doubled) and normalizing the timeline of the doubled input. |
Replace Frames | If there are frames with CC errors, it replaces them with skip frames (inserts the last good frame received in place of missing ones). This solves issues such as an IRD that lost synchronization when it received broken frames. This mechanism also creates a variant of the input (doubling the input). |
Renumber CC | encapsulation. When there are CC errors in TR101 analysis it means that the counter has a gap due to the lost frames. This mechanism can re-write the CC counter for the downstream devices, so they will see a continuous increase of the counter. |
Delay (ms) | Enter the delay that the Error Concealment adds to the stream in miliseconds. Error Concealment needs to buffer the stream to analyze it. One second is a reasonable value. Lower values may cause the Error Concealment to not be able to fix some of the frames. |
CBR Padding (kbps) | Enter a value for the rate at which padding will be added to maintain a specific output transport bitrate. For example, if you have a video bitrate at 5000 kbps or that varies from 3000-5000 kbps and audio at 64 kbps, total bitrate will be max 5064 kbps or min 3064 kbps. With CBR padding set at 6000 kbps, 6000 kbps is being delivered downstream at all times, ensuring a consistent bitrate. |
PCR Interval (ms) | Select the frequency at which Program Clock Reference is inserted into the outputs Transport stream. Options include:
|
Advanced | |
Billing Codes | If you would like to track usage for this Source, enter your Billing Code details, see Billing Codes . (Supported for Broadcasters v14.8+) |
Billing Channel ID | An optional arbitrary string - you can enter anything you want to for your record-keeping. This is not related to ZEN Master Channels. |
Billing Password | Enter the password that corresponds to this billing code. |
Auto-Pull Billing Code | If you would like to track usage for this Source when using Auto-Pull connections, enter the billing code that corresponds to this stream. The relevant billing can be obtained from the organization that received the billing code from Zixi. |
Auto-Pull Billing Password | Enter the password that corresponds to this auto-pull billing code. |
Traffic Shaping | Traffic shaping is a network management technique used to control and optimize the flow of data. It ensures a smooth streaming experience by prioritizing video traffic and managing bandwidth usage. Set at 0 (default) for no traffic shaping, or 1 for automatic traffic shaping. Note: this option is only for sources for Zixi Broadcaster 18.2 or later. |
Max FEC Overhead % | Allows you to limit the additional data added for FEC (Forward Error Correction). Available for sources for Zixi Broadcaster 18.2 or later. |
Adaptive FEC | Adaptive FEC improves the efficiency of FEC by adjusting the amount of extra data sent according to network conditions. By default Adaptive FEC is turned on, but there are some cases where fixed FEC is needed and you will want to disable it. Some examples of cases where fixed rate FEC is preferable:
|
Frame Thinning | Allow non-critical frames to be dropped to reduce latency. Available for sources for Zixi Broadcaster 18.2 or later. |
MTU/Auto Pull MTU {bytes} | Specify the maximum transmission unit (largest data packet that a network-connected device will accept) in bytes for the Auto Pull. (For Pull sources only.) |
Frozen Video Minimal Duration {seconds} | Specify the default minimal duration in seconds of frozen video after which the Broadcaster will trigger a Frozen video alert. Default: 10 seconds. This setting is supported for Broadcaster version 16.3 and higher. For existing sources, you may need to restart the source. |
Blank Video Minimal Duration {seconds} | Specify the default minimal duration in seconds of blank video after which the Broadcaster will trigger a Blank video alert. Default: 10 seconds. This setting is supported for Broadcaster version 16.3 and higher. For existing sources, you may need to restart the source. |
Ignore Monitoring PIDs | Ignore PIDs with empty audio streams to prevent false warnings - enter a comma-delimited list of PID numbers that should not be monitored for null content. |