Creating New Transcoding Profiles
In order for the Broadcaster to switch from one encoding to another, different transcoding profiles must be configured first. These transcoding profiles include the transcoding settings that can be used for the transcoding of streams.
Supported Video and Audio formats include:
- Video Decoding – MPEG2, H.264/AVC, H.265/HEVC, Raw.
- Video Encoding – MPEG2, H.264/AVC, H.265/HEVC, Raw.
- Audio Decoding – AAC, MPEG-1 Audio Layer I / II / III, MPEG-2 Audio Layer I / II / III, AC-3 (Dolby Digital), Opus.
For AC-3, which can contain up to six discrete channels of sound, the transcoder only supports the left and right channels and will ignore the other channels
- Audio Encoding – AAC, AAC-HE (High Efficiency), AAC-HEv2; E-AC-3 (Enhanced Dolby Digital), MP1 (MPEG-1 Audio Layer II), Opus, or passthrough other audio codecs.
AAC-HE and AAC-HEv2 are only supported for Zixi Broadcasters, v13 and up.
The transcoder comes with the following pre-set common video profiles:
1080i60 / 1080i59.94, 1080p30 / 1080p25, 720p60, 720p50 / 720p30, 576i60 / 576p25, 480i60 / 480p29.97
You can also define your own custom profiles.
For downstream satellite workflows, you will probably need to generate constant bitrate (CBR) streams. This setting is configured at the individual input level (not the transcoding profile level). To set a CBR, enter the desired Transport Stream Bitrate (Kbps) as described in the Transcoding Broadcaster Input Streams section.
To Create a New Profile:
In the Transcoder page, click + New Profile.
The Add New Profile window is displayed:
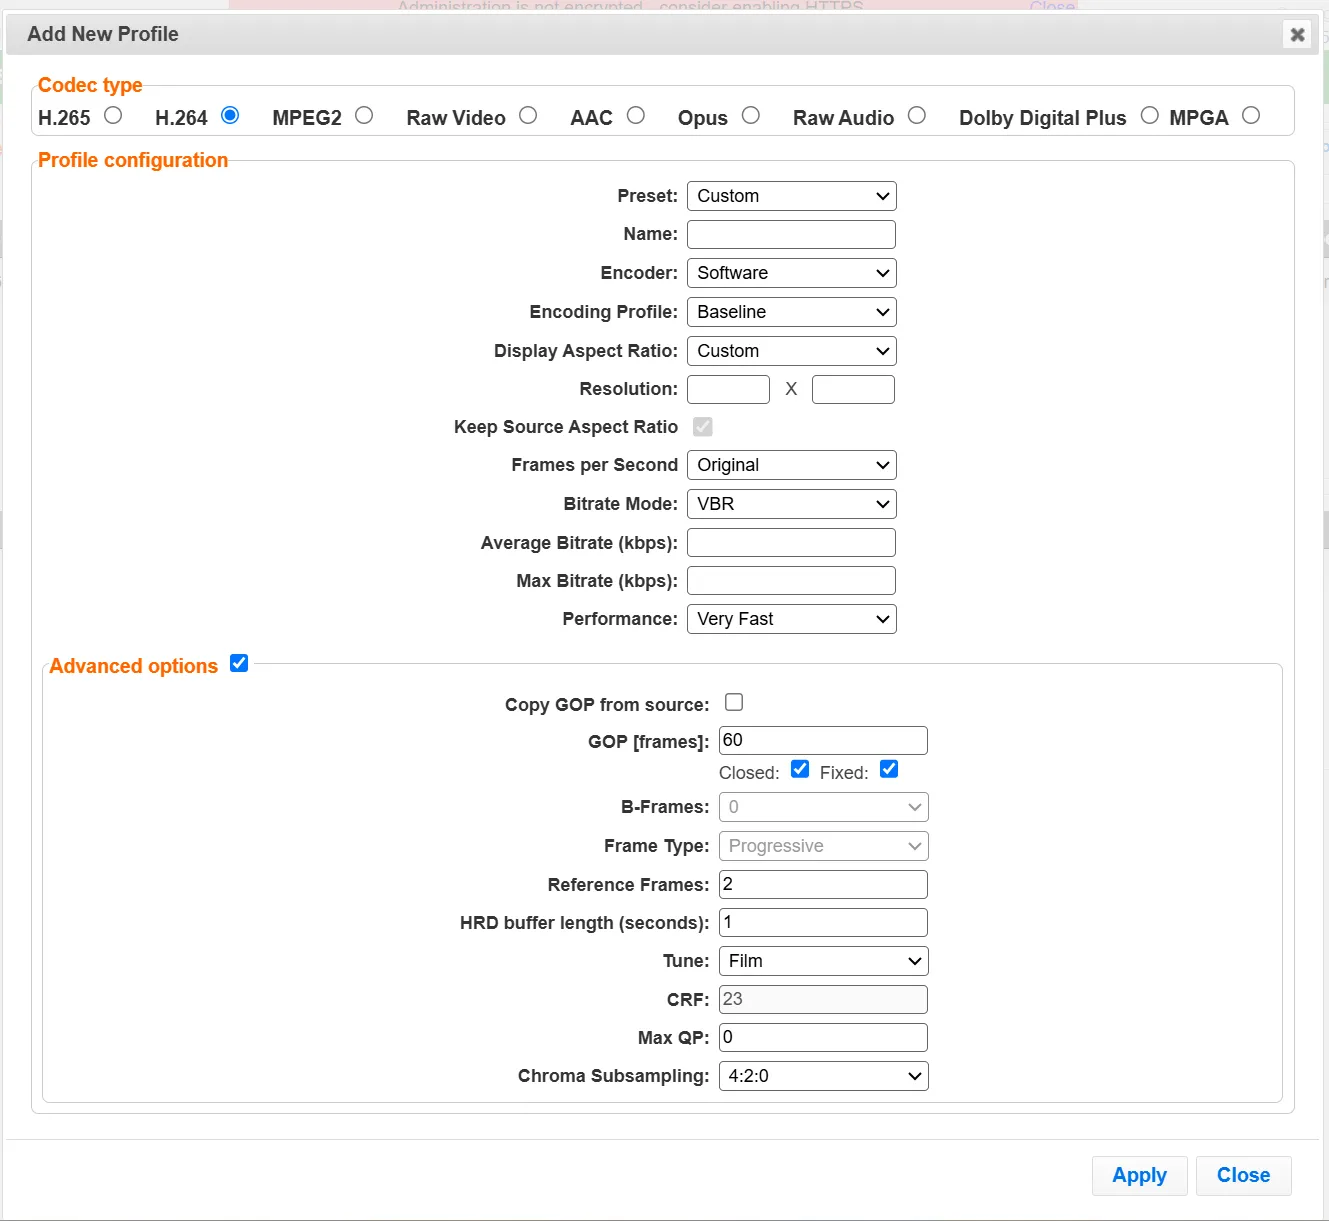
Select the desired Codec type - MPEG2, H.264, H.265, or Raw Video for a video profile or select AAC, Opus, MPGA, Dolby Digital Plus, or Raw Audio for an audio profile.
Enter the desired fields in the Profile configuration (see table below for additional parameters). Select a specific Preset profile to automatically fill in the default settings for that profile, OR select Custom to create a new profile from scratch.
You can edit specific fields of a preset configuration while creating the profile.
If you want to configure the Advanced options for the video profiles, select Advanced options and fill in the respective fields (see table below for additional parameters).
Click Apply.
The newly configured profile is created and appears on the screen.
Transcoding Profiles Parameters
Parameter | Description |
|---|---|
Profile configuration | For Video - MPEG2, H.264, H.265, Raw Video |
Preset | Select one of the pre-configured presets or select Custom to create a new profile from scratch. Even if you select a preset configuration, you can still change its settings. Default: Custom |
Name | Enter a unique name for the profile. |
Encoder (for H.265, H.264) | Select one of the following options:
|
Encoding Profile | Select the relevant encoding profiles: For H.265 video profiles:
For H.264 video profiles:
For MPEG2 video profiles:
|
Display Aspect Ratio | Select the aspect ratio of the video display. If you select Custom, enter the desired resolution in the Resolution field. |
Resolution | Enter the new resolution in pixels if resizing the video. |
Keep Source Aspect Ratio | Select this checkbox (default) to maintain the original aspect ratio. |
Frames/Fields per Second | Select a new frame rate or select Original to use the original frame rate of the stream. Default: Original Note: When a new frame rate is specified, it is applied using "Smooth frame rate conversion". Note: When the frame rate is converted, captions in the elementary stream are preserved. |
Bitrate Mode | Select the desired bitrate mode:
|
Average Bitrate (kbps) | Specify the average bitrate for the profile. |
Max Bitrate (kbps) | Specify the maximum bitrate for the profile. Available only if the Bitrate Mode is set to VBR or CRF. |
Performance (for H.265, H.264) | Select the performance of the transcoding. Possible values for Software encoder range from Ultra Fast, which provides the best quality while utilizing high CPU/GPU, to Slower, which has the lowest quality but uses much less CPU/GPU. Default: Very Fast Possible values for Nvidia encoder are High Quality, High Performance, and Default. |
Advanced Options | |
Copy GOP from source | Select this checkbox if you want to maintain the source GOP length (not structure). Enabling this option will generate an I-frame in the transcoded stream with the exact timestamp as in the source stream. The Copy GOP from source option is only available when selecting the Original option in the Frames per Second field. If you want to change the source GOP length, specify the new GOP length in the GOP [Frames] parameter. |
GOP [frames] | Specify the number of frames in a GOP (Group of Pictures). Default:60 |
GOP Settings |
|
B-Frames | Specify the maximal number of consecutive B frames in the GOP. Default: 0 |
Frame Type | Specify the frame type – progressive or interlaced (MPEG2 only on SW transcoding). Default: Progressive |
Reference Frames | Specify the number of frames that can be referenced for each frame. Default: 2 |
HRD buffer length (seconds) (for H.265, H.264) | Specify the length of the HRD buffer in MPEG-2. |
VBV buffer length (seconds) (for MPEG2) | |
Tune (for H.265, H.264) | The x264 tune options assign options to optimize for certain types of content:
|
CRF (for H.265, H.264) | The Constant Rate Factor (CRF) is the default quality (and rate control) setting for x264 and x265 encoders. You can set the values between 0 and 51, where lower values would result in better quality, at the expense of higher file sizes. Higher values mean more compression, but at some point, you will notice the quality degradation. |
MAX QP (for H.265, H.264) | The QP (Quantization parameter) controls the compression rate. Ranging from 0 (No compression) to 51 (Max compression). Max QP - controls the maximum value the encoder can set for QP. For example, a low number will result in a lower compression rate, causing the video to look better; however, requiring a higher bitrate. A higher max QP value may reduce the visual quality but results in a lower bitrate. |
Chroma Subsampling | Converts the source chroma subsampling (method for "compression" of raw images) to 4:4:4/ 4:2:2 / 4:2:0.
|
Bit Depth | Conversion of the 10-bit HDR color encoding source to 8 BPP. This feature is enabled for the following configurations:
If the source is 10-bit, select one of the following:
|
Profile configuration | For Audio – AAC, OPUS, RAW Audio, MPGA. |
Name | Enter a unique name for the profile. |
Bitrate (kbps) | Specify the bitrate for the profile. Available values are:
|
Sampling Rate | You can convert the audio sampling rate from 44.1kHz to 48kHz and vice versa. For Opus only 48kHz is available. Select one of the following options:
|
Encoding Profile (for AAC) |
|
Advanced Mode
The fields discussed below are optional and available only in Advanced Mode.
To enter Advanced Mode add the URL parameter ?advanced=1 to the Zixi Broadcaster URL in your browser and press Enter/Return to reload the page:

Note the Advanced Mode settings are generally intended for advanced users and special cases. If you do not understand the settings, you should probably accept the default values.
Video - Profile Configuration
- Frame Conversion Threads - Specify how many threads to use when the profile includes FPS conversion.
- Encoding Width - Specify the width in Pixels that will be used to calculate the sampling aspect ratio of the video. The pipeline will generate video frames with dimensions of [encoding_width, height] and configure the encoder with the calculated sampling aspect ratio so that during playback, the video will be stretched to the configured display aspect ratio. The Default is empty value (or 0), meaning a sampling aspect ratio of 1:1, so the pipeline will resize the frames according to the provided dimensions [W x H].
- Performance - Very Slow is available, which has the lowest quality but uses much less CPU/GPU.
Video - Advanced Options
- Threads - Specify the number of threads allocated specifically for the encoding process. Default: 0