HTML Overlay Installation Guide
Overview
Zixi Broadcaster’s HTML overlay feature overlays a dynamic HTML page on the video stream during the transcoding process. As part of this process, the images from the HTML page are “burned” into the video.
The process uses Chromium Embedded Framework (CEF) to render the HTML page and then the image is passed on to the transcoder to overlay on top of the raw video frame, which is then encoded. The overlay process occurs at the configured frame rate in the transcoder, assuming the CPU that is used for the CEF process can keep up. Animations on the HTML page can be rendered on the video stream. However, currently audio on the HTML page is not introduced into the transcoded stream.
There are two processes that are handled by the Zixi Broadcaster:
- CEF (HTML Rendering) - CEF uses the CPU to render the HTML page at the designated frame rate during transcoding.
- Transcoding - The transcoding process may use either NVIDIA GPU or a CPU. The transcoding includes the following processes: video decoding process, the page overlay insertion, and the video re-encoding.
It is expected that CPU usage will be significantly higher when using the HTML overlay feature versus a normal transcode because of the CEF rendering process and the handling of raw video frames.
Deployment Options
To deploy the HTML Overlay feature, select one of the following options:
- Pre-packaged AMI - this option includes a pre-configured Broadcaster with HTML Overlay enabled. Customers with an AWS account have the option to directly install the AMI on an instance in their account. To obtain an Pre-packaged AMI, contact your Zixi Account Manager. After obtaining the AMI, you can either load a saved Broadcaster configuration or they update it using SSH.
- Manual installation - in this option, you will need to install the CEF plugin and the Xserver components on the Zixi Broadcaster machine. This document describes the process of installing these components on an existing Zixi Broadcaster. To install a new Zixi Broadcaster, follow the instructions in the Zixi Broadcaster Installation Guide.
The setup has two phases:
- Install a GNOME desktop + TigerVNC server — provides the virtual display that CEF renders into
- Install the CEF plugin and reconfigure Broadcaster — extracts the plugin, patches the Broadcaster launcher, and installs a systemd service that ties everything together
Supported Platforms
Scripts are provided for four environments. Use the folder that matches your deployment:
Platform | Folder | Default User |
|---|---|---|
Amazon Linux 2023 (EC2) | amazon_linux2023/ | ec2-user |
AlmaLinux 9 on AWS (EC2) | aws_alma_linux/ | ec2-user |
AlmaLinux 9 on Azure | azure_alma_linux/ | azureuser |
AlmaLinux 9 on Protectli appliance | protectli_alma_9/ | root (VNC) / zixi (Broadcaster) |
Note: All scripts must be run as root (or via sudo).
Prerequisites
Before beginning:
- Zixi Broadcaster is already installed at ~/zixi_broadcaster-linux64/ for the platform user
- The CEF plugin archive (zixi_cef_plugin*.tar) is present in the home directory of the platform user
- All scripts from the appropriate platform folder have been transferred to the server and are executable (chmod +x *.sh)
- The server has internet access or the required packages are available via a local repository
- For the GPU option for transcoding, make sure the latest Nvidia drives have been installed.
Phase 1: Install GNOME Desktop and TigerVNC
This phase installs the graphical environment that CEF needs to render HTML content.
See the link at the top of the page to download all scripts referenced below.
Script
Platform | Script to Run |
|---|---|
Amazon Linux 2023 | al3_setup_vnc_gnome.sh |
All AlmaLinux variants | setup_vnc_gnome.sh |
What the script does
- Installs the GNOME desktop group and TigerVNC server via dnf
- Sets the system default to boot into graphical mode (graphical.target)
- Prompts you to set a VNC password for the platform user
- Creates the VNC user-to-display mapping in /etc/tigervnc/vncserver.users (display :1 → platform user)
- Configures the GNOME session in ~/.vnc/config
- Creates/patches the vncsession-stop helper script at /usr/libexec/vncsession-stop
- Creates the [email protected] systemd unit if it doesn't already exist
- Enables and starts the VNC service on display :1
- (AlmaLinux only) Opens TCP port 5901 in the firewall for external VNC access
How to run
When prompted, enter and confirm a VNC password for the platform user. This password is used to connect to the desktop remotely.
Verify
After the script completes, confirm the VNC service is running:
You should see active (running). To connect from a remote machine, use any VNC client pointed at <server-ip>:5901.
Phase 2: Install the CEF Plugin and Configure Broadcaster
This phase installs the CEF plugin, patches the Broadcaster startup sequence, and installs a systemd service.
Important: This phase requires the VNC session from Phase 1 to already be running. The Broadcaster service is bound to vncsession@:1.
Files used in this phase
File | Purpose |
|---|---|
zixi-html-overlay-startup.sh | Main installation script — run this one |
modify-runnerbc.sh | Patches the Broadcaster runnerbc launcher (called automatically) |
startup_broadcaster.sh | X display initialization script (called at Broadcaster startup) |
zixibc.service | Systemd service unit for Broadcaster |
What zixi-html-overlay-startup.sh does
- Stops the zixibc service if it is currently running
- Extracts the zixi_cef_plugin*.tar archive into the Broadcaster installation directory (~/zixi_broadcaster-linux64/)
- Runs modify-runnerbc.sh to patch the runnerbc launcher (see below)
- Copies zixibc.service to /etc/systemd/system/
- Reloads systemd
- Starts the zixibc service
- Prints service status
- Notifies you to wait approximately 30 seconds for Broadcaster to fully initialize
How to run
Navigate to the home directory of the platform user, then run the script:
Verify
You should see active (running). Broadcaster's web UI should be accessible after about 30 seconds.
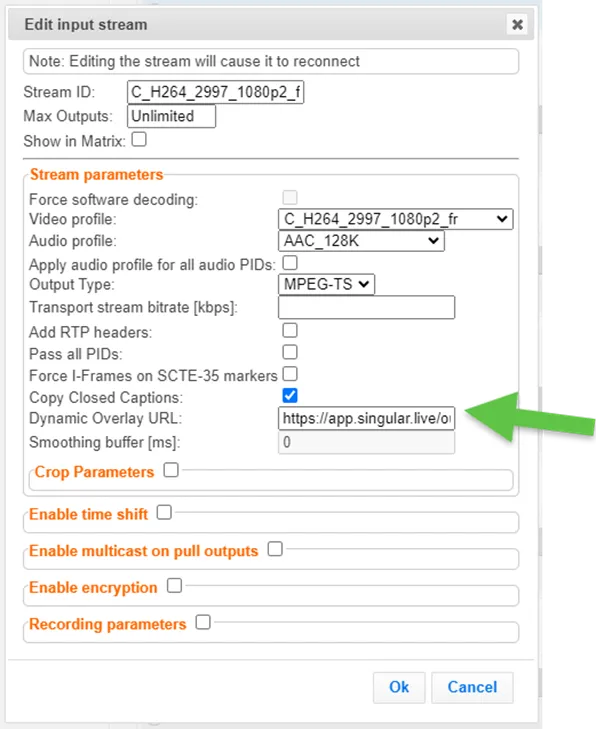
You should also see the Dynamic Overlay URL in the Broadcaster UI for Adding/Editing an Input stream:
How the Components Work Together
startup_broadcaster.sh — X Display Initialization
This script runs once at Broadcaster startup (injected into runnerbc by modify-runnerbc.sh). It:
- Sets the DISPLAY environment variable to :1.0
- Disables DPMS (display power management / screen blanking) via xset so the virtual display stays active
- Grants the root user access to the X display via xhost, which is required for Broadcaster to connect to it
modify-runnerbc.sh — Patching the Launcher
The Broadcaster package ships a shell script called runnerbc that starts the Broadcaster binary. This script inserts two lines into runnerbc immediately before its main loop:
- A 20-second sleep — gives the VNC/GNOME session time to fully initialize before Broadcaster tries to connect to the display
- A call to startup_broadcaster.sh — runs the X display initialization described above, as the platform user
zixibc.service — Systemd Service Unit
This service unit ties everything together at the OS level:
- Requires vncsession@:1.service — Broadcaster will not start unless the VNC display is already running
- Sets DISPLAY=:1 in the service environment so Broadcaster and CEF know which display to use
- Starts Broadcaster via runnerbc, which in turn runs the patched startup sequence
- Restarts automatically on failure (2-second delay between retries)
- Installs under graphical.target so it starts with the desktop environment
Platform-Specific Differences
User Account
Each platform variant uses a different default user. The scripts are pre-configured for:
Platform | User | Broadcaster install path |
|---|---|---|
Amazon Linux 2023 | ec2-user | /home/ec2-user/zixi_broadcaster-linux64/ |
AWS AlmaLinux | ec2-user | /home/ec2-user/zixi_broadcaster-linux64/ |
Azure AlmaLinux | azureuser | /home/azureuser/zixi_broadcaster-linux64/ |
Protectli AlmaLinux 9 | zixi (Broadcaster) / root (VNC) | /home/zixi/zixi_broadcaster-linux64/ |
Package Group Name
The GNOME installation command differs between distributions:
- AlmaLinux / RHEL-based: dnf groupinstall "Server with GUI"
- Amazon Linux 2023: dnf groupinstall "Desktop"
Firewall
- AlmaLinux variants: The VNC setup script actively opens port 5901 via firewall-cmd
- Amazon Linux 2023: The firewall commands are present but commented out — port access should be managed via AWS Security Groups
Service Management Reference
Action | Command |
|---|---|
Start Broadcaster | systemctl start zixibc |
Stop Broadcaster | systemctl stop zixibc |
Restart Broadcaster | systemctl restart zixibc |
Check Broadcaster status | systemctl status zixibc |
Enable Broadcaster at boot | systemctl enable zixibc |
Check VNC session status | systemctl status vncsession@:1 |
View Broadcaster logs | journalctl -u zixibc -f |
Troubleshooting
Broadcaster fails to start / CEF errors
- Confirm the VNC session is running: systemctl status vncsession@:1
- If the VNC session is not active, Broadcaster will not start because zixibc.service requires it
- Check logs: journalctl -u zixibc -n 50
VNC session fails to start
- Verify the VNC password was set: ls ~/.vnc/passwd (as the platform user)
- If missing, re-run vncpasswd as the platform user and restart the service: systemctl restart vncsession@:1
startup_broadcaster.sh errors (xset/xhost)
- These errors indicate the X display is not ready
- The 20-second sleep in runnerbc is usually sufficient, but on slower machines it may need to be increased by manually editing runnerbc
- Check that DISPLAY=:1 is set correctly in the environment
CEF plugin not found after extraction
- Confirm the zixi_cef_plugin*.tar file is present in the platform user's home directory before running zixi-html-overlay-startup.sh
- Verify the archive extracted into the correct directory: ls ~/zixi_broadcaster-linux64/ should include CEF-related files
Port 5901 not accessible (AlmaLinux)
- Check the firewall: firewall-cmd --list-ports
- If not listed, re-run the firewall commands from setup_vnc_gnome.sh manually
- Also check cloud security group / network ACL rules
File Reference