Adding Adaptive Channels
Adaptive Channels deliver a group of streams (with the same content) that are created to support different types of devices and various network conditions. Each stream in the group has a different bitrate.
The adaptive Channels support the HLS standard.
The following procedure describes how to add an Adaptive Channel in ZEN Master. In addition, an explanation of each of the configuration parameters is given in the table below.
To add an adaptive channel:
In the main navigation, click Channels.
Click + Add. The Create New Channel selection menu is displayed.
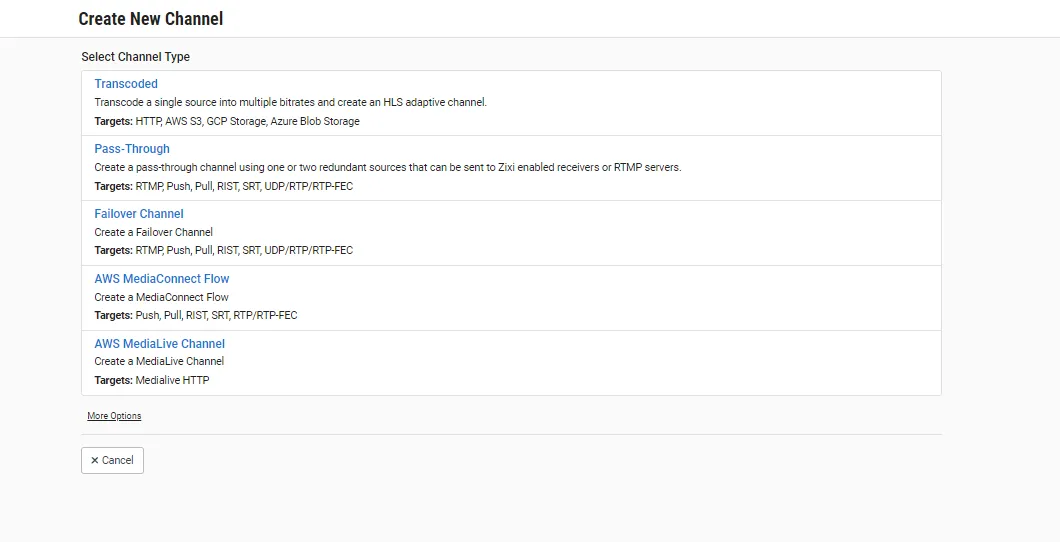
Click More Options.
Click on Adaptive. The Create Adaptive Channel window is displayed.
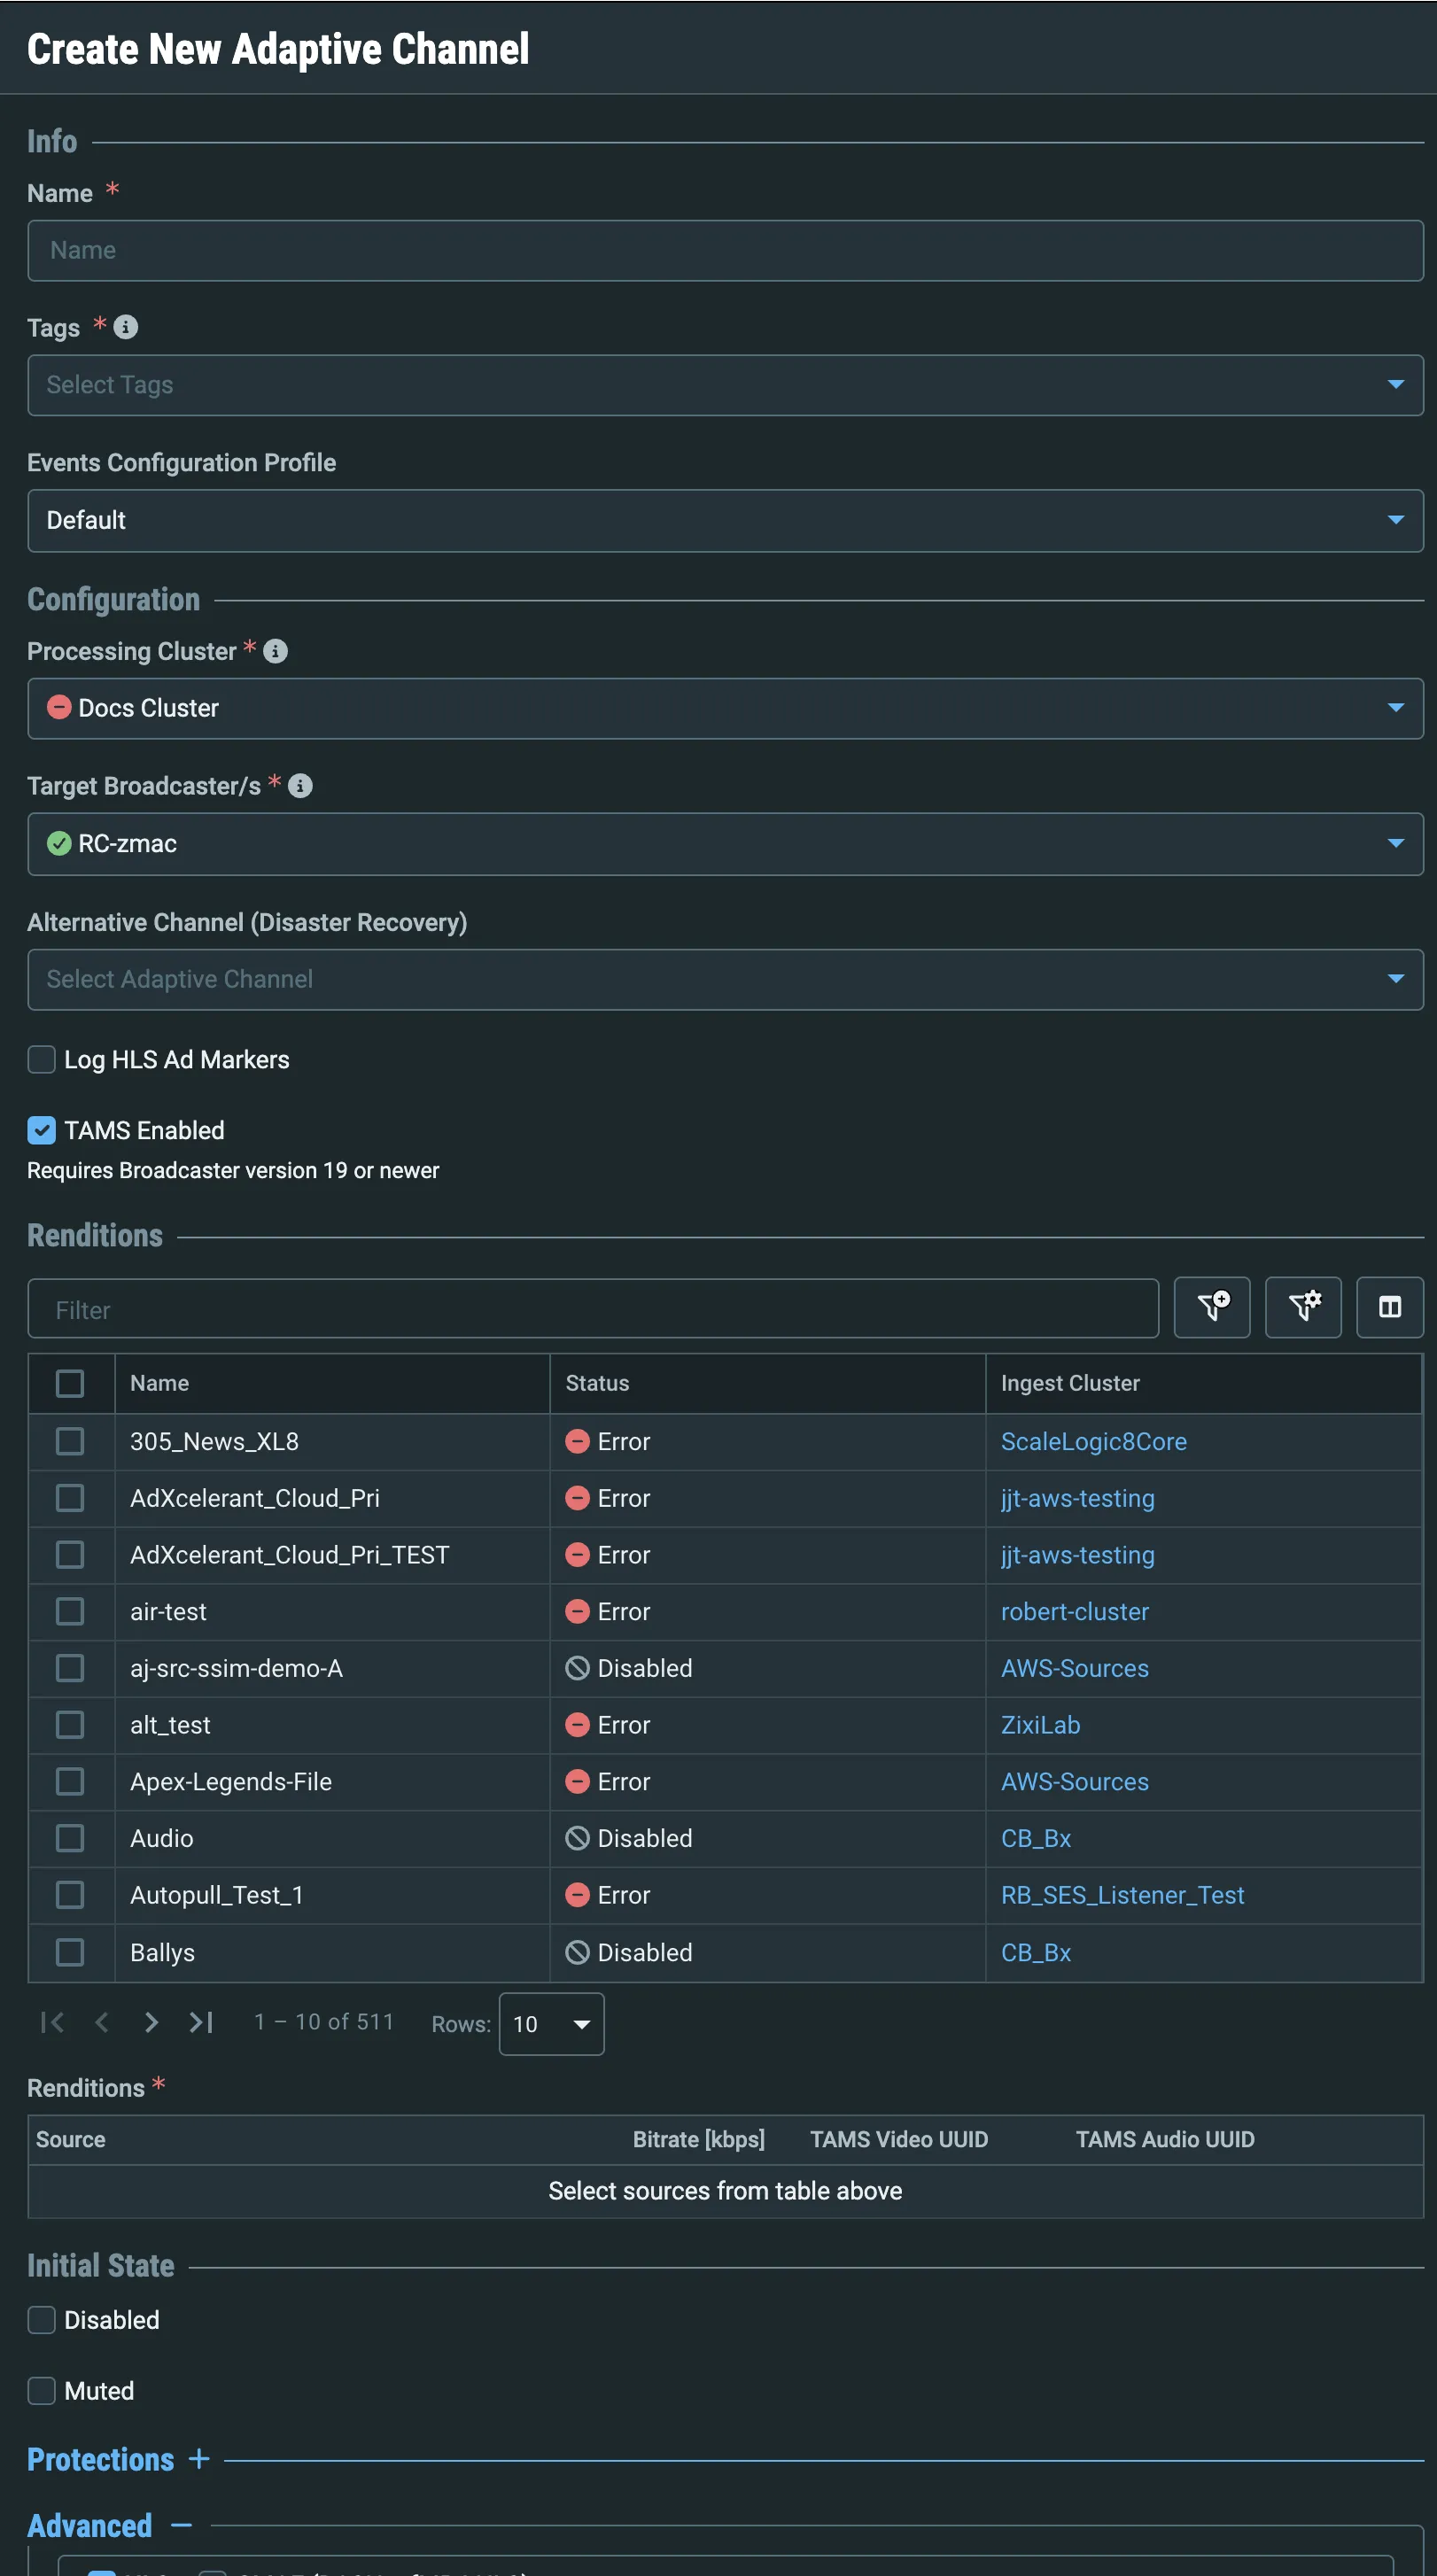
In the Info section, in the Name field, enter a logical name for the Channel.
In the Tags field, select one or more of the predefined Tags from the drop-down list. Tags are used for access control. By selecting an Tag, you are relating this Channel to that Tag. Tags are associated with certain roles (through the Users & Roles screen), and roles, in turn, are associated with users and user groups. If you would like to create a new Tag, see Creating a Tag.
In the Events Configuration Profile field, select from the dropdown list the profile that you would like to apply to this Channel. By default, the Default profile is applied.
Events Profiles consist of a series of rules that determine precisely how various types of Events are logged and what results they trigger.
In the Configuration section, in the Processing Cluster field, select from the drop-down list one of the Channel Processing clusters that has been configured in ZEN Master. The selected cluster will be used to process this Channel.
If the Source does not exist in the cluster, then the cluster will pull the Source automatically.
In the Target Broadcaster/s field, select your broadcaster preference. Either select a specific broadcaster to be used OR specify your preference for using primary vs. backup broadcasters. Options are: Prefer Primary Broadcasters, Primary Broadcasters only, Backup Broadcasters only or Prefer Backup Broadcasters.
For managed clusters, it is not recommended to select a specific broadcaster, as the broadcaster's availability may not remain stable.
If you want to configure an alternative path for disaster recovery, in the Alternative Channel (Disaster Recovery) field, select the Channel that will be used as the alternative path. For more details, see Disaster Recovery (Alternative Path).
If you would like to log HLS ad markers for this Channel, select the Log HLS Ad Markers checkbox.
If you would like to enable the channel to be delivered to TAMS, check TAMS Enabled - note that to deliver to TAMS, you must be using a v19 Broadcaster (or later).
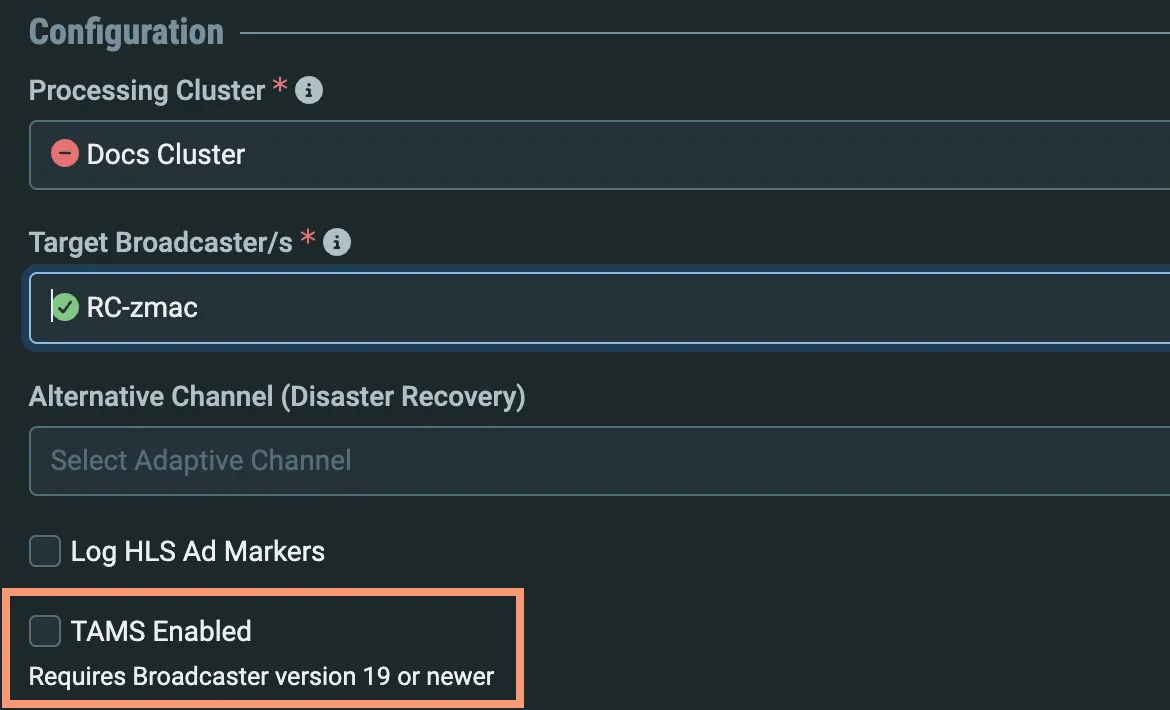
Note: the Support MultiAudio option in the Advanced settings must be selected for channels that will be delivered to TAMS.
In the Renditions section add one or more Sources to the Channel and configure the bitrate for each Source. Live streams will include the approximate current bitrate of the stream. The bitrate will be added to the HLS/DASH manifest, so the player can select which rendition to use. This is done as follows:
- Find the Source that you would like to add either by scrolling through the list of available profiles or by entering a search word into the Filter text-box.
- Add a Source by clicking the + button next to the profile.
- Click on the Bitrate textbox for the Source and enter the stream's estimated /notional bitrate. The bitrate value will be added to the HLS/DASH manifest, so the player can select which rendition to use. Live streams will include the approximate current bitrate of the stream. These values can be overwritten.
- Repeat the above procedure for each Source that you would like to add to the Channel. Note: If you would like to remove a Source from the Channel, click on the - button next to the Source.
In the Initial State section, select the Disabled checkbox if you would like to disable this Channel upon initial configuration.
Select the Muted checkbox if you would like to disable error/recovery notifications for this Channel upon initial configuration.
You can Enable/Unmute the Channel at any time.
If you would like to customize the HLS/CMAF configuration, click Advanced (for Broadcasters running v12+). The Advanced settings are displayed.
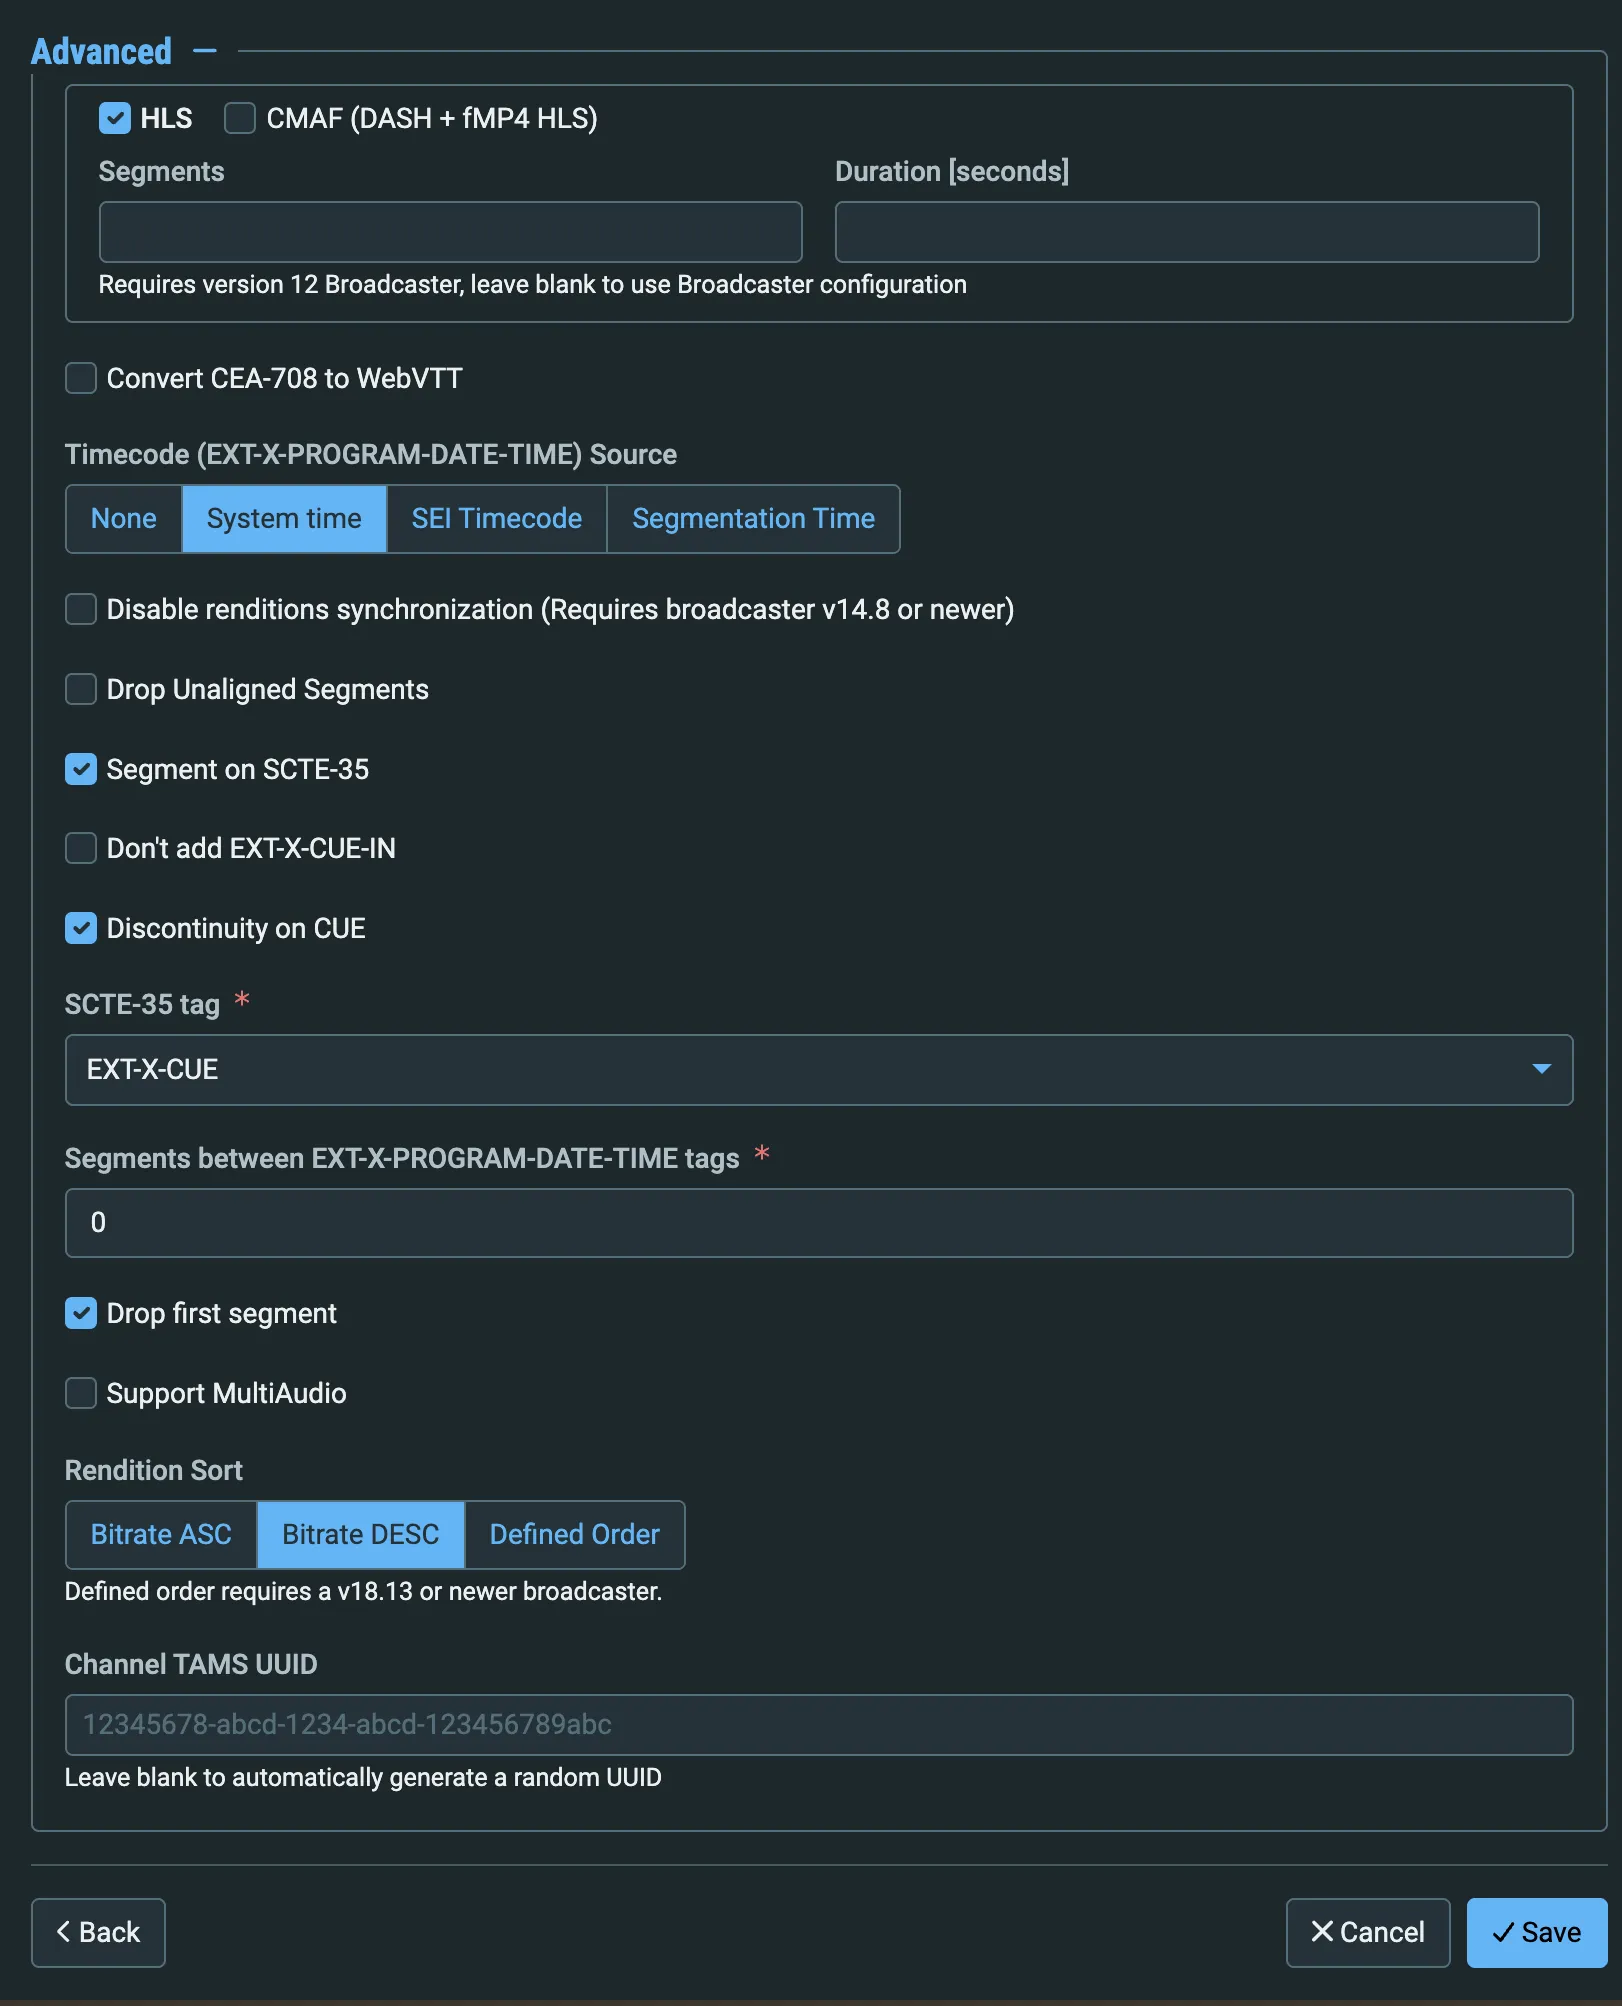
Select the desired adaptive streaming protocols - CMAF (DASH + fMP4 HLS), HLS and configure the following:
- In the Segments field, specify the number of segments that will be included
- In the Segment Duration field, specify the duration of each segment in seconds.
If you would like to convert the captions format from CEA-70 to WebVTT, then select Convert CEA-708 to WebVTT.
If you check the Convert CEA-708 to WebVTT checkbox, you can optionally customize the position of the WebVTT captions by selecting the Custom WebVTT Positioning option and configuring the follwing settings:
- Vertical Position - Specifies the vertical position of the cue box as a percentage of the video height. 0=top.
- Horizontal Position - Specifies the horizontal position of the cue box’s anchor point as a percentage of the video width. 0=left.
- Text Alignment - Defines the text alignment or anchor point within the cue box.

Note: Positioning captions requires Broadcaster v18.8 or later.
Under Timecode (EXT-X-PROGRAM-DATE-TIME) Source, select your preference for inserting a timecode. Options are: None, System time (default), SEI Timecode, or Segmentation Time.
Select the Disable Renditions Synchronization checkbox if you would like to disable synchronization between the Sources. (Supported for Broadcasters v14.8+)
Select the Drop Unaligned Segments checkbox if you want to drop segments of a multi-bitrate adaptive group that are not aligned. These segments will not be included in the playlist.
Select the Segment on SCTE-35 checkbox if you want to use the SCTE-35 markers found in the source input to segment the stream and the #EXT-X-CUE-IN/#EXT-X-CUE-OUT tags will be added to the manifest.
Select the Don't add EXT-X-CUE-IN checkbox to remove the EXT-X-CUE-IN tag, which indicates where to return back to the program, from the playlist.
In the field SCTE-35 tag field, select the ad marker tag that will be used to segment the stream:
- EXT-X-CUE – cue-in and cue-out ad markers.
- EXT-X-DATERANGE - With EXT-X-DATERANGE ad marker tags, you use SCTE35-OUT attributes to specify the timing of the ad avail.
- EXT-X-CUE and EXT-X-DATERANGE – Zixi will use both ad marker tags to segment.
- EXT-X-CUE and EXT-OATCLS-SCTE35 – the EXT-OATCLS-SCTE35 marker tag includes the Base-64 encoded SCTE payload. Zixi will use both ad marker tags to segment.
In the field Segments between EXT-X-PROGRAM-DATE-TIME tags field, configure the frequency in which the EXT-X-PROGRAM-DATE-TIME tags will appear in the manifest by specifying the number of segments between each EXT-X-PROGRAM-DATE-TIME tag.
Select Drop first segment to drop the first segment in the manifest. For HLS workflows, this can help ensure smoother playback by eliminating non-keyframe segments that might cause decoding issues.
Select Support MultiAudio checkbox if the input stream includes multiple audio channels, choose this option to enable multiple separate audio channels.
Note: this option must be selected for channels that will be sent to TAMS.
Select Ascending Playlist Order to order the master playlist in ascending order by bitrate.
Click Save. The new Channel is created.
Adaptive Channel Configuration Parameters Table
Parameter | Description |
|---|---|
Info | |
Name | Specify a name for the Adaptive Channel in ZEN Master. |
Tags | Select one or more of the predefined Tags from the drop-down list. Tags are used for access control. By selecting an Tag, you are relating this Channel to that Tag. Tags are associated with certain roles (through the Users & Roles screen), and roles, in turn, are associated with users and user groups. If you would like to create a new Tag, see Creating a Tag . |
Events Configuration Profile | Select from the dropdown list the profile that you would like to apply to this Channel. By default, the Default profile is applied. Note: Events Profiles consist of a series of rules that determine precisely how various types of Events are logged and what results they trigger. |
Configuration | |
Processing Cluster | Select from the drop-down list one of the Channel Processing clusters that has been configured in ZEN Master. The selected cluster will be used to process this Channel. Note: If the Source does not exist in the cluster, then the cluster will pull the Source automatically. |
Target Broadcaster/s | Select your broadcaster preference. Either select a specific broadcaster to be used OR specify your preference for using primary vs. backup broadcasters, options are: Prefer Primary Broadcasters, Primary Broadcasters only, Backup Broadcasters only or Prefer Backup Broadcasters. Note: For managed clusters, it is not recommended to select a specific broadcaster, as the broadcaster’s availability may not remain stable. |
Alternative Channel (Disaster Recovery) | ZEN Master features a disaster recovery feature that enables reverting an entire path after the Source (i.e., Channel) to go through an alternative path, which is usually hosted on an alternative cloud/region. The redirection to the alternative path is manual. So, in case of a fault, if there is no time to troubleshoot a problem, this mechanism allows the user to select the feed that has an issue, click a button and revert the stream to go through a pre-configured alternative path. For example, if you have a Channel on GCP and a secondary Channel and Broadcaster on Azure. If something goes wrong with the GCP path, you can click the Go to Alternative button and failover everything to Azure. |
Log HLS Ad Markers | If you would like to log the HLS Ad Markers for this Channel, select this checkbox. |
TAMS enabled | Allows the channel to be sent to a TAMS target. If the channel is TAMS enabled, Support MultiAudio must also be checked. |
Renditions | In the Renditions section add one or more Sources to the Channel and configure the bitrate for each Source. To remove a Source from the Channel, click on the - button next to the Source. The bitrate value will be added to the HLS/DASH manifest, so the player can select which rendition to use. Live streams will include the approximate current bitrate of the stream. These values can be overwritten. |
Initial State | |
Disabled | Select this checkbox if you would like to disable this Channel upon initial configuration. |
Muted | Select this checkbox if you would like to disable error/recovery notifications for this Channel upon initial configuration. |
Advanced | |
HLS | Set the values for Segments and Segment Duration. If you would like to disable HLS, deselect the checkbox. |
CMAF (DASH + fMP4 HLS) | If you would like to enable CMAF (DASH + fMP4 HLS), select this checkbox and set the values for Segments and Segment Duration. |
Convert CEA-708 to WebVTT | If you would like to convert the captions format from CEA-70 to WebVTT, then select this checkbox. |
Custom WebVTT Positioning | Check to change the position of captions in the video frame. Note that positioning captions requires Broadcaster v18.8 or later. |
Vertical Position (%) |
|
Horizontal Position (%) |
|
Text Alignment |
|
Timecode (EXT-X-PROGRAM-DATE-TIME) Source | Select your preference for inserting a timecode. Options are: None, System time (default) or SEI Timecode. |
Disable Renditions Synchronization | Select this checkbox if you would like to disable synchronization between the Sources. (Supported for Broadcasters v14.8+) |
Drop Unaligned Segments | Select this checkbox if you want to drop segments of a multi-bitrate adaptive group that are not aligned. These segments will not be included in the playlist. |
Segment on SCTE-35 | If enabled, SCTE-35 markers found in the source input will be used to segment the stream and the #EXT-X-CUE-IN/#EXT-X-CUE-OUT tags will be added to the manifest. |
Don't add EXT-X-CUE-IN | Select this option to remove the EXT-X-CUE-IN tag, which indicates where to return back to the program, from the playlist. |
SCTE-35 tag | Select the ad marker tag that will be used to segment the stream:
|
Segments between EXT-X-PROGRAM-DATE-TIME tags | Configure the the frequency in which the EXT-X-PROGRAM-DATE-TIME tags will appear in the manifest by specifying the number of segments between each EXT-X-PROGRAM-DATE-TIME tag. |
Drop first segment | Enabling this option will drop the first segment in the manifest. For HLS workflows, this can help ensure smoother playback by eliminating non-keyframe segments that might cause decoding issues. |
Support MultiAudio | If the input stream includes multiple audio channels, select this option to enable multiple separate audio channels. This option must be checked if you checked TAMS enabled. |
Ascending Playlist Order
| Select this option to order the master playlist in ascending order by bitrate. |